KiwiSDR Operating Information
Updated 2 July 2025
KiwiSDR 2:
-
The online store is open for orders!
Our online store: kiwisdr.nz - Tech Minds YouTube review video
-
VK2MB KiwiSDR Secrets (YouTube)
Manly-Warringah Radio Society lecture by Richard VK2SKY - Production status Updated 18 July
- Factory image/video
© 2016-2025 KiwiSDR NZ. All rights reserved.
The content of these pages are not open source and may not be used elsewhere without permission.
The content of these pages are not open source and may not be used elsewhere without permission.
New Kiwi owners:
KiwiSDR 2:
-
The software is pre-installed and should work out of the box.
Do not install the supplied SD card. The SD card is only for re-flashing the BeagleBone Green in case the Debian filesystem becomes corrupted. Your Kiwi configuration will be lost if you re-flash. -
Unlike KiwiSDR 1 the first network software update is delayed until the first overnight update window
(1-5AM local time) so you don't have to wait an extra hour before first use.
This assumes the Kiwi has a network connection to the Internet etc.
KiwiSDR 2 runs Debian 11. -
Serial number and default admin password:
If you purchased direct from KiwiSDR NZ the serial number and admin password is found on the
printed sheet inside the shipping box. Serial numbers are of the form
2xxxx and the password four numbers and/or lowercase letters (exampler2d2 ). This information is also written on a label on the bottom of the unit. So for a unit purchased from a distributor (WiMo, ML&S, DXE etc.) you would look there. If necessary email your serial number tosupport@kiwisdr.com and we can tell you the corresponding password. -
Every KiwiSDR 2 has the proxy service enabled by default.
So straight out of the box you can connect using the serial number, e.g.
2xxxx.proxy.kiwisdr.com
On the admin page,
connect tab, you may disable the proxy and use whatever connection method you like (e.g. by domain name, IP address, DUC domain etc). You can also change the proxy name from the serial number to a name you choose (assuming it's not already taken). -
Because the proxy URL is available from anywhere on the Internet the admin page
(2xxxx.proxy.kiwisdr.com/admin)
has a default password as described above.
As soon as possible please change the admin password on the admin page, security tab.
- Forget your admin password? Reset it by following the instructions here.
-
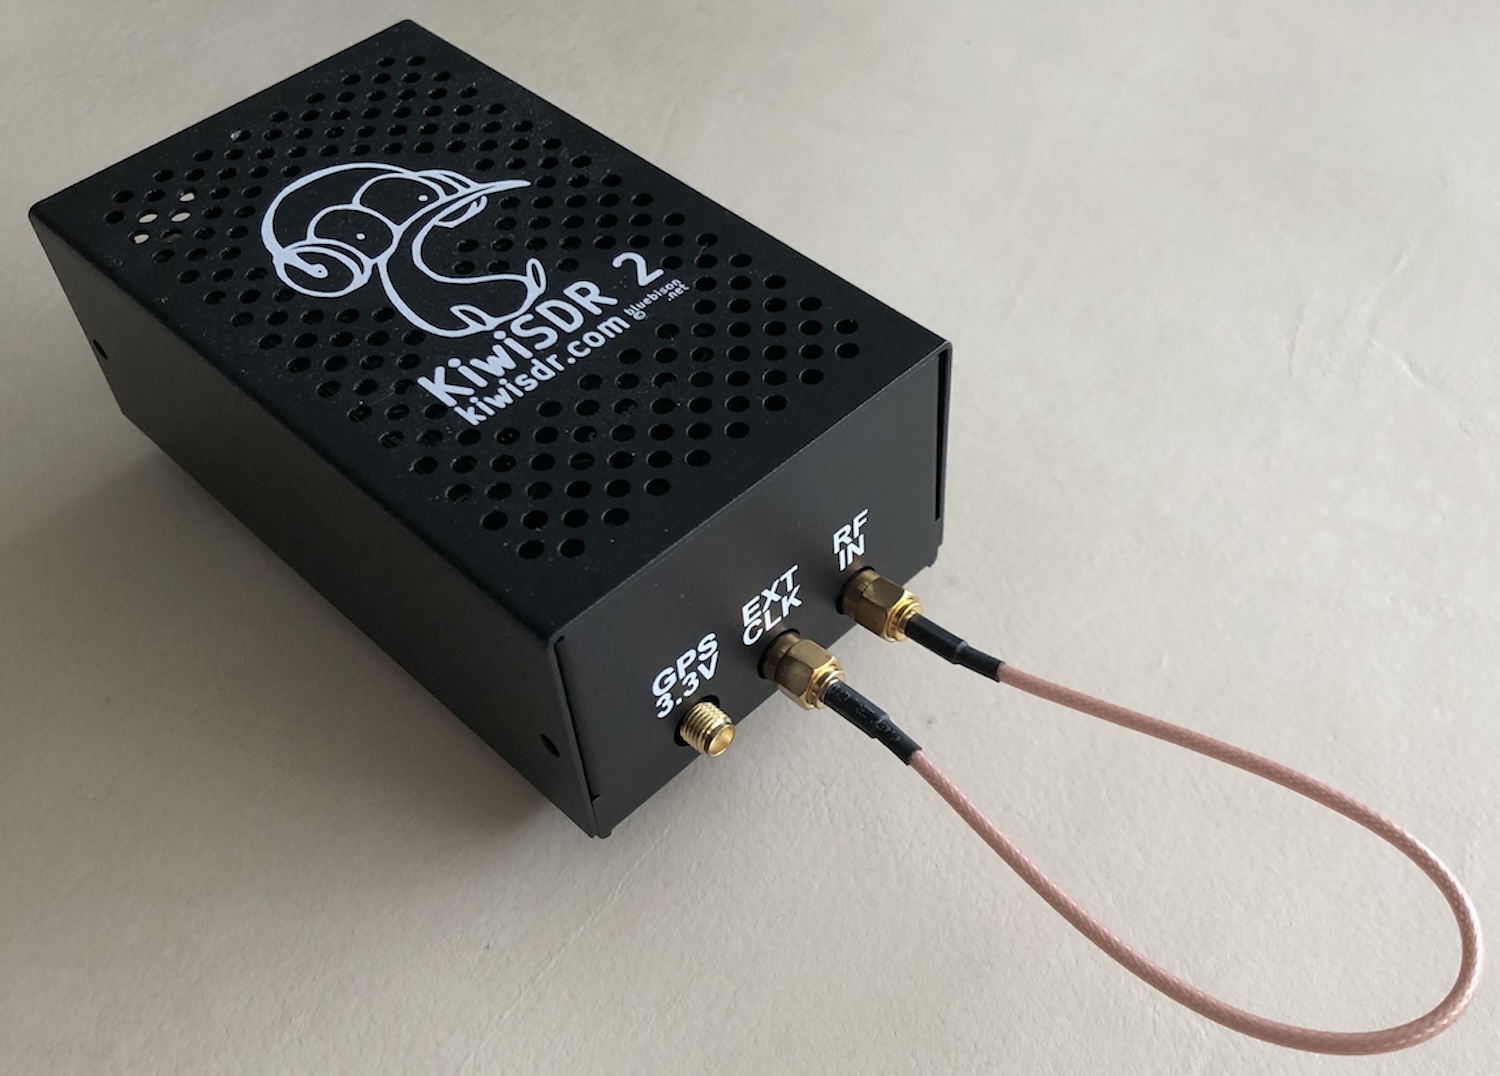
KiwiSDR 2 connectors are reversed compared to KiwiSDR 1Because the Kiwi board is mounted upside down inside the enclosure (to make access to the Beagle SD card slot easier) the
RF IN (antenna) andGPS 3.3V SMA connectors are left/right reversed compared to what you might be used to on KiwiSDR 1. See this photo. -
Customize the details of your Kiwi user interface.
When you connect to the SDR you will note that default values for the name, location and other details are displayed. You can change these by connecting to the admin page (2xxxx.proxy.kiwisdr.com/admin) and changing the information on theConfig andWebpage tabs. If you wish to make your Kiwi publicly accessible then change the settings on the adminPublic tab. Changing some of these setting will prompt you to restart. -
If your KiwiSDR 2 needs to be re-flashed because you can no longer connect to it, and you are unable
to perform the procedure described here
for making a re-flasher SD card, then, as a last resort, please contact
sales@kiwisdr.nz (note.nz not.com ). We can send you a re-flasher SD card. Instructions for using the card are here: kiwisdr.com/reset.
KiwiSDR 1:
-
The software is pre-installed and should work out of the box.
Do not install the supplied SD card. The SD card is only for re-flashing the BeagleBone Green in case the Debian filesystem becomes corrupted. Your Kiwi configuration will be lost if you re-flash. - Be sure to initially give your Kiwi a connection to the Internet and let it update to the latest software release. This process can take up to 60 minutes. KiwiSDR 1 does not wait until overnight to perform the initial network update as KiwiSDR 2 does.
- Forget your admin password? Reset it by following the instructions here.
The software version is displayed on the
The easiest way to update is to power-up or restart when a connection to the Internet is available on the local network. The Kiwi checks for new software whenever it starts.
If it is successfully updating you will get an "update in progress" message when attempting to connect.
There is also anUpdate tab on the admin interface (see below) for controlling various aspects of the update process.
If it is successfully updating you will get an "update in progress" message when attempting to connect.
There is also an
Beagle root password:
Did your Kiwi not have a Beagle/Linux root password set and now it's asking for one?
Recent security changes have automatically applied a password to any root or debian account passwords that were blank/unset.
The new password set is the Kiwi's serial number as shown on the admin page network tab or as written on the the Kiwi circuit board (or as written on the bottom of the enclosure with KiwiSDR 2). For some versions of KiwiSDR 1 the password might be the same as the Kiwi admin password. The debian account password might also be the default "temppwd" if the password change process failed.
Also note that with Debian 9 and later logins using the root account are no longer enabled by default. Instead, login using the debian account and "sudo su" to get a root shell.
Introduction:
For everyone:
- Kiwi user interface
- Mobile device (touchscreen) differences Updated
- Passband adjustments Updated
- Keyboard & mouse shortcuts
- Saved session parameters
- International Beacon Project (IBP) label updates
- URL tuning and other parameters Updated
- Frequency entry field Updated
- Frequency URL link
- Right-click menu
- Query/control URLs New
- KiwiSDR discussion forum
- Frequently asked questions (FAQ)
For owners / admins:
- Troubleshooting advice
- Setup hardware
- Power supply advice
- Don't use the wrong size DC plug
- Under-voltage due to cable voltage drop #1 new installation problem
- Antenna advice
- Setup software
- Upgrading a Debian 8 based Kiwi to Debian 11 New
- Downloading the software onto an SD card Updated
- Network configuration
- Finding the Ethernet IP address of the KiwiSDR
- Point-to-point Ethernet connection to a host computer
- /admin configuration interface
- Configuring a reverse proxy
- Getting the IP address (DHCP-assigned or static) from the LED pattern
- LED pattern if FPGA communication fails
- Configuration when using a down-converter
- Installing the KiwiSDR and software
- List of third-party extensions and software packages
- Special access-related configuration
- Antenna switch configuration
- Operation and optimization
- Forget your admin password? Click here
- DX label editing
- Self-test function New
- ADC overload
- Noise reduction advice
- Manual frequency calibration
- Controlling the server from a Beagle login
- Miscellaneous
How it works
The KiwiSDR is always accessed over a network connection using a browser running on another computer or mobile device. This can be from your local network or by anyone on the Internet if you have chosen to make your KiwiSDR publicly available. The user interface is only moderately optimized for mobile devices and there are no mobile apps yet for Android or iOS. The software does not support attaching a monitor or keyboard/mouse directly to the Kiwi BeagleBone.
Connect to the local network using an Ethernet cable between the Kiwi and your Ethernet switch, router, cable modem or firewall. An IP address for the Ethernet port is usually assigned by a DHCP server that is likely to already be running on your network. See the network configuration section for complete details.
Please consider making your Kiwi publicly available to Internet users by listing it on rx.kiwisdr.com Particularly if your Kiwi is located in an interesting or under-represented part of the world. There are options for limiting public access to a subset of the four available channels.
Just tell me how to connect to my local Kiwi
For KiwiSDR 2 try the serial number based link (replace "2xxxx" with your actual serial number) For any KiwiSDR try these links if the computer running the browser is on the same local network as your Kiwi: If these don't work use one of the methods below to find the Kiwi's IP address. Then use the IP instead of "kiwisdr.local", e.g. 192.168.1.123:8073 Type this into the address bar of your browser. If you have multiple Kiwis "kiwisdr-2.local", "kiwisdr-3.local" etc. can be used.
More information about Kiwi networking.
List of third-party extensions and software packages
Here is a list of Kiwi extensions and related software packages available from third parties.
When installed the extensions will appear in the Kiwi extensions menu.
Extensions:
-
Antenna switch extension by Kari, OH1KK for LZ2RR's
MS-S7-WEB antenna switch and others including Kiwi Beagle GPIO.
Note that as of Kiwi software version v1.665 the antenna switch has been integrated into the
Kiwi server and is available from the user control panel
RF tab. And the admin pageExtensions tab for configuration.
List of antenna switches supported by Kiwi's internal switch software
Software packages:
- CATSync by Oscar, DJ0MY. External rig synchronization tool. Blog, YouTube video.
- Pavlova dispatcher by priyom.org. Easily find an available KiwiSDR given the world region and/or frequency you're interested in.
Installing the KiwiSDR and software
KiwiSDR 2:
- A micro-SD card is not supplied with KiwiSDR 2. Supply your own 8 GB or larger card when necessary (e.g. for making backups or if you need to re-flash the Beagle).
- For the "complete" product the software is pre-installed on the Beagle inside the black case. The micro-SD card slot on the Beagle is accessible by removing the case top.
-
For the "board-only" product, where you supply your own Beagle, you will have to download the
latest Kiwi software image and copy it to the SD card. Then re-flash the Beagle from the SD card.
This can be done prior to, or after, installing the KiwiSDR 2 board.
See here for details.
Please remove any USB or Ethernet connections from the Beagle when installing software from the micro-SD card.
- This additional Quick Start Guide gives information about:
-
Installing the KiwiSDR / BeagleBone Green combo into the enclosure if you purchased the complete "full" version. Note that the software is pre-installed on the Beagle.
Do not install the supplied micro-SD card for normal operation.
-
Installing the KiwiSDR onto a BeagleBone that you supply if you purchased the
"board only" version. Then installing the software by re-flashing the Beagle from the micro-SD card.Note: It is recommended you first place the latest Debian image on the SD card.
See here for details.
Please remove any USB or Ethernet connections from the Beagle when installing software from the micro-SD card. - A printed copy of the Quick Start Guide is included in every KiwiSDR shipping box.
Network configuration
- The two cases of network configuration
- Local use only
- Local and public (Internet) access
- Allowing public access on port 8073
- Using UPnP to open the router port automatically
- Finding the Ethernet IP address of the KiwiSDR
- Specifying the connection URL
Additional information:
- Configuring the dynamic DNS update client (DUC)
- Configuring a reverse proxy
- Configuring an Ethernet static IP address
- Using a USB network connection for initial Beagle access
- Using a serial connection
- Point-to-point Ethernet connection to a host computer
The two cases of network configuration
In certain circumstances you may not have to do any network configuration at all. The Kiwi will just work out-of-the-box after you plug into the local network. There are two cases.
-
You only want to use the Kiwi on your local network without allowing public access over the Internet.
Try connecting to the Kiwi using
my.kiwisdr.com or
kiwisdr.local:8073,
or for KiwiSDR 2, 2xxxx.proxy.kiwisdr.com
(replace "2xxxx" with Kiwi serial number).
If you have multiple Kiwis "kiwisdr-2.local", "kiwisdr-3.local" etc. can be used.
But see below if this doesn't work. - In addition to the above if you want your Kiwi to be publicly available then port 8073 must usually be opened to the Internet by changing your router. But there is software on the Kiwi to help perform this task automatically.
It is likely your local network already has a DHCP server that will automatically assign an IP address to the Kiwi. This function is usually performed by your network router. The kiwisdr.local hostname resolves to this IP address via software on the Kiwi and the host computer you're connecting from (the one running your browser). But the kiwisdr.local hostname may not be recognised by all systems, particularly Windows. For a workaround to this problem, or if you need to specify the IP address manually (e.g. 192.168.1.10:8073), see below for how to find your Kiwi's IP address.
Second case, public access:
For public access you face a couple of issues.
- Opening port 8073 on your router so incoming connections can be made.
- Specifying whether a domain name or IP address will be used to connect to your Kiwi.
- Using advanced techniques to overcome problems encountered with the above
(e.g. UPnP port configuration or DDNS)
Allowing public access on port 8073
For the public to connect, your KiwiSDR must answer on port 8073 at a fixed public IP address.
Although any port number, e.g. 80, can be configured (see below).
If you are on a residential network a single public IP address is sometimes shared by
multiple computers, usually via Network Address Translation (NAT).
You must modify the NAT configuration of your router to
route connections to port 8073 of your public IP address to whatever local IP
address was assigned to your Beagle (port mapping). To do this you'll need the
network information provided using the methods described below.
If your router supports UPnP the Kiwi can create the NAT entry automatically.
The other issue is that port mapping requires the local IP address of your KiwiSDR be unchanging over time. After all, you have to enter a fixed local IP address when the port mapping entry is made. Your KiwiSDR was likely initially assigned a local IP address with DHCP (dynamic host configuration protocol) from your router. DHCP does not guarantee that the same local IP address will be assigned each time the KiwiSDR is booted. To solve this problem most routers have another table to assign local IP addresses based on the unique MAC address associated with the Beagle. The MAC address is provided using the methods described above. You must then pick an unused local IP address that is outside the range of local IP addresses that DHCP uses yet still part of your local IP address space.
For example, our local network uses the address block 192.168.1.1 - 192.168.1.254 and is allocated as follows:
| IP address | fixed address? | |
|---|---|---|
| 192.168.1.1 | yes | router |
| 192.168.1.2 | start of DHCP allocated space | |
| 192.168.1.99 | end of DHCP allocated space | |
| 192.168.1.100 | yes | web server |
| 192.168.1.101 | yes | public KiwiSDR |
| 192.168.1.102 | yes | development KiwiSDR |
The port mapping and fixed IP tables are then setup in the router as follows:
| NAT port mapping: | |||||
|---|---|---|---|---|---|
| public IP address |
port | maps to |
private IP address |
port | service |
| 103.26.16.225 | 80 | ----> | 192.168.1.100 | 80 | web server |
| 103.26.16.225 | 8073 | ----> | 192.168.1.101 | 8073 | public KiwiSDR |
| fixed IP assignment: | ||
|---|---|---|
| local IP address |
Beagle MAC | host |
| 192.168.1.100 | 1C:BA:8C:A1:BE:EF | web server |
| 192.168.1.101 | 84:EB:18:E2:0E:A2 | public KiwiSDR |
| 192.168.1.102 | 1C:BA:8C:E3:3D:0B | development KiwiSDR |
Using UPnP to open the router port automatically
Beginning with release v1.65 of the Kiwi software your router can be contacted by the Kiwi using the Universal Plug-and-Play (UPnP) protocol and asked to open port 8073 automatically. Not all routers support this protocol, or have it enabled by default. This Kiwi feature is designed to save you from performing this task manually which can sometimes be difficult if you are not familiar with Network Address Translation (NAT) rules and the operation of your router.
For security reasons this feature is disabled on the Kiwi by default. To activate, go to the network tab on the admin page (e.g. kiwisdr.local:8073/admin) and set the button called
Finding the Ethernet IP address of the KiwiSDR
Figuring out the IP address assigned to your KiwiSDR is the first step in manual network configuration.
In most network setups a DHCP server on your router will assign this IP address
to the Ethernet port on the Beagle of your KiwiSDR. The problem is figuring out what this address is.
Here are some suggestions:
- For KiwiSDR 2 the proxy service is enabled by default and can be used to directly access the Kiwi: 2xxxx.proxy.kiwisdr.com (replace "2xxxx" with your Kiwi serial number).
- Use my.kiwisdr.com to connect to the Kiwi (see below)
- Use kiwisdr.local:8073/admin to connect to the Kiwi admin page (see below)
- Read the IP address from the Beagle LEDs (see below)
- Use the free Fing network scanner app for iOS/Android at www.fing.com (see below)
- Check your router's list of DHCP-assigned IP address (see below)
Use my.kiwisdr.com to connect to the Kiwi
If your Kiwi is able to contact kiwisdr.com when it starts up it will register its local IP
address. Then when a browser from a computer on the same local network connects to
my.kiwisdr.com it will automatically be
redirected to the Kiwi. The local IP address will appear in the browser address bar.
If multiple Kiwis are present on the network the browser will display a table allowing
you to connect to each Kiwi individually.
Use "kiwisdr.local:8073/admin" to connect to the Kiwi admin page
The network information about your KiwiSDR is available on the "network" tab at
kiwisdr.local:8073/admin
So if you can connect to the Kiwi this way the Kiwi itself can tell you its IP address for use in further network configuration.
If you have multiple Kiwis "kiwisdr-2.local", "kiwisdr-3.local" etc. can be used.
But this method may not always work.
Most versions of Windows don't recognize the kiwisdr.local hostname. Here is a workaround. But do not use this workaround for Window 10 or later. There appears to be some sort of conflict and using kiwisdr.local will result in connections that have lots of audio overrun problems. Use one of the other methods listed here to find the IP address.
If you install Apple iTunes for Windows then the Apple Bonjour mDNS-based location discovery software gets installed. Now kiwisdr.local should be recognized. It is possible to uninstall iTunes but leave Bonjour/mDNS working with the right Windows control-panel manipulation. We understand that future versions of Windows may include mDNS by default. So try using kiwisdr.local before using the workaround.
Read the IP address from the Beagle LEDs
Beginning with version v1.174 of the software, the four LEDs on the Beagle (lower board of the two board stack) will display an encoded status message. This message includes the IP address, either assigned by DHCP or set statically. See the section: Getting the IP address (DHCP-assigned or static) from the LED pattern.
Use the free Fing network scanner app for iOS/Android at www.fing.com
There are also free third-party network scanner apps. We use one called Fing for the iPhone / iPad.
After the scan, look for an entry where the Ethernet MAC address vendor has decoded to "Texas Instruments".
TI is the manufacturer of the processor chip on the BeagleBone where the Ethernet controller resides.
Check your router's list of DHCP-assigned IP address
Of course your router, or other device running DHCP, knows the IP address allocated to the Kiwi.
If you know how to access this device you might be able to determine the latest "new" device added to the DHCP list and hence the IP address.
Specifying the connection URL
This is the second issue to consider for the case of a Kiwi with public access.
The method used to establish a public connection to your Kiwi is specified in the connect tab on the admin page. This includes specifying your own domain name, using the detected public IP address of the Kiwi or specifying your own IP address. Also the advanced techniques described below.
Configuring the dynamic DNS update client (DUC)
An issue you must consider for public access is how the outside world will contact your Kiwi.
Do you already own a domain name (e.g. bob.com) and has your Internet provider assigned you
a static public IP address? Great, you're all set. All you have to do is create a sub-domain, say
kiwisdr.bob.com and point it to your public IP. Now your Kiwi will be reachable at kiwisdr.bob.com:8073/ assuming you're using the default port 8073.
But for many people this is not the case. They don't own a domain and their relatively inexpensive residential Internet service supplies them a dynamic IP address that changes every so often. To overcome these issues what you want is something called "dynamic DNS (DDNS)" where a company like noip.com allows you to use one of their generic domain names. And also gives you a program (dynamic update client, "DUC") to run on your local computer that tells them when your ISP has changed your dynamic IP so the generic domain name can be updated.
To simplify this process beginning with release v1.83 a DUC for noip.com has been built into the Kiwi software and can be configured on the connect tab of the admin webpage. You can use either the free DDNS noip.com service that requires a manual acknowledgement every 30 days or one of their paid plans without this restriction. Go to noip.com and create a unique hostname for one of their generic domains (e.g. kiwi1234.ddns.net) and setup an account. Then on the connect tab of the Kiwi admin page select "DUC domain" on the menu. Then enter the noip.com account information, host name and hit the "click to (re)start DUC" button. In the status field below you should see the response "DUC started successfully" or an error message if there is a problem. To start the DUC every time the Kiwi restarts change the "enable DUC at startup?" switch to "yes".
Configuring a reverse proxy
The rules for the proxy service are changing.
Please see
this Kiwi forum thread for details.
Instructions for using the proxy service (KiwiSDR 1 and KiwiSDR 2):
- Kiwi-1: Request a proxy key from support@kiwisdr.com and enter it as described below.
Next, choose a proxy name and enter it in the
host name field. - Kiwi-2: All Kiwi-2s have the proxy automatically configured using the name
2xxxx.proxy.kiwisdr.com
where
2xxxx is the serial number of the Kiwi-2 (written on the bottom of the Kiwi-2 case). -
Kiwi-2: You can change the
2xxxx proxy name from the serial number to a name you choose (assuming it's not already taken). Change theAutomatic configuration? switch toNo . Then enter your name in thehost name field. Observe the naming restrictions. Click the blue(re)register button. Click therestart button that will appear at the top of the page. -
Note:
If you had re-flashed at some point by downloading the v1.800 image onto an sd card it might have installed an
invalid proxy key.
The current image does not have this problem.
If the
user key field of the proxy section on the admin connect tab shows040d60a4e655b9c2b5f7aae16ecff then you have the invalid key. Contact support@kiwisdr.com and we'll send you the correct key to use.
-
On the connect tab of the admin page select
Reverse Proxy from the menu. -
In the reverse proxy section put your assigned user key in the
User key field. -
Enter a name you choose in the
Host name field.
Valid characters are a-z, 0-9, -, _ (no upper case, no leading '-', no leading digit)
The name must not already be in use. -
Press the blue
Click to (re)register button. - The status message should say one of:
- "Existing account, registration successful"
- "New/Existing account, registration successful"
- "Updating host name, registration successful"
- If a
restart button appears at the top of the page appears, click it.
Multiple proxied Kiwis behind a single Internet connection
It is possible to run multiple Kiwis using the proxy behind a single Internet connection.
Do this by requesting one unique user key per KiwiSDR 1 (KiwiSDR 2's have a unique proxy key built-in).
Give each Kiwi a unique host name in the proxy section of the admin page, connect tab. For KiwiSDR 2 this can either be the serial number when the
This works even if all the Kiwis are configured to use port 8073 on the local network.
Configuring an Ethernet static IP address
If you are unable if get your router to associate the Beagle Ethernet MAC to a fixed local IP then there is an alternative. It is now possible to configure the Kiwi to use a static local IP address rather than obtaining one via DHCP. You'll have to get initial access to the Kiwi using one of the methods above. But then you can go to the admin page (e.g. kiwisdr.local:8073/admin) and then the Using a USB network connection for initial Beagle access
If your network is very limited and has no DHCP server at all you can get initial access to the Kiwi by using a USB cable between the Kiwi Beagle and another computer as the network connection (micro-USB for BeagleBone Green, mini-USB for BeagleBone Black). This is a standard feature of the Beagle and instructions are available here. Note that it requires the installation of a USB networking driver on your computer. Once logged into the Beagle using the But note the Kiwi software itself does not support using USB networking. This method is only for gaining initial access to the Beagle in order to change the Ethernet configuration so the Ethernet can subsequently be used.
Using a serial connection
As a last resort it is possible to connect a serial cable between the Beagle and a host computer.
You'll need to purchase a USB-to-serial cable that is designed to connect to the Beagle serial port header. More information is here. Be certain to buy a cable that presents 3.3V to the Beagle and not 5V (the 5V cables are more common). You'll need to remove the Kiwi board in order to access the Beagle's serial header. Use a serial com program to login to the Beagle at 115.2k baud using the debian account and obtain a root shell. Then edit the file Point-to-point Ethernet connection to a host computer
For step-by-step instructions on how to do this with Window 10 see this Kiwi forum post. This should works with most recent Windows versions.
Some users simply want to install an Ethernet cable directly between the Kiwi and a laptop or PC and not involve other equipment (like a router) and not involve the Internet. This might be because they are traveling or only have a wireless connection between their PC and an Internet access device that has no Ethernet ports. We now have a solution for this case.
Starting with the v1.47 release the Kiwi software uses something called avahi-autoipd which takes over when the Kiwi is unable to locate a DHCP server to get an IP address for the Ethernet port. A random-but-unique link-local IP address in the 169.254.0.0/16 range is then assigned to the Ethernet. Similar software present on all modern Macs and PCs does the same thing. Now the PC and Kiwi should be able to talk to each other. Since you don't know what IP address has been assigned to the Kiwi you instead use the name kiwisdr.local. On Windows this currently requires the Bonjour/mDNS package to be installed with the workaround described here. Macs are already setup. So now you can connect to the Kiwi by using kiwisdr.local:8073/ and kiwisdr.local:8073/admin to administrate.
It's also now possible to observe the Beagle LEDs to see what IP address was assigned.
Note that it takes
more than 60 seconds
after the Kiwi boots before it decides there is no DHCP and it should assign a link-local address. So please be patient before trying to connect from the PC.
A question remains however. If your PC only has a wireless connection to the Internet, and your new Kiwi was delivered with an installed software version prior to v1.47 (which is going to be true for quite a while) and you can only plug the Kiwi into the PC, then what can you do? The answer is to download a special version of the Kiwi software from the Internet onto your PC. Then copy it to a micro-SD card. And finally re-flash the Kiwi on-board filesystem from the SD card. Follow the instructions here.
/admin configuration interface
Almost all configuration and administration of the KiwiSDR is done through the admin web interface at kiwisdr.local:8073/admin (adjust hostname as required). Each tab at the top of the page selects a group of related configuration parameters or status information. A restart button for the server will appear when certain parameters are changed. Use it when you have made all of your changes in all of the tabs.
- Status
- Mode
- Update
- Backup
- Network
- GPS
- Log
- Console
Control
Restart, reboot and power off
The The
The
Similarly the
connect
The configuration on the connect tab is used to define the URL used to connect to your Kiwi from the local network and, optionally, from the public Internet. Here also is the configuration of the DDNS DUC and reverse proxy as described in the network section of this document.
Config
The sensitivity of your antenna will determine how the base waterfall colors will appear. We suggest changing the

Here is the same waterfall with
Once you have found a good value of
The
Configuration when using a down-converter
The Kiwi frequency scale and other places where the frequency appears and is entered can be adjusted to account for any VHF/UHF down-converter (transverter) you have installed ahead of the Kiwi antenna input. The Enter the number of kHz necessary to bring the converted frequency to the correct position on the scale. For example to map 50-52 MHz to 28-30 MHz place 22000 kHz in the field (50000 - 22000 = 28000). To map 144-148 MHz to 28-32 MHz set the field to 116000 kHz (144000 - 116000 = 28000) and set the
The
The coverage fields can be used even if you are not using a down-converter. Suppose you have a Kiwi specializing in the AM MWBC band with attenuation outside those frequencies. You could set the fields to 540 and 1710 and "0.5MHz - 1.7MHz" would be displayed.
Webpage
Map field
Note: Consider specifying coordinates that don't reveal your exact location. You can get the "Google format" map reference by Googling the name of your location (town etc.), clicking on Google maps from the search result, then clicking on the "share or embed map" item from the Google maps menu at the top left. Place in the Grid square field
If you are not familiar with grid squares just click on the You can replace the default startup background photo with your own. Scale a photo file (jpeg, png, etc.) to be 350 pixels high. Starting with the v1.17 release there is a "file chooser" dialog so you can download the file to the Kiwi directly using the admin page. Although there is a
The
Note that the
Public
Note: Your Kiwi will appear on other sites like rx.linkfanel.net and ve3sun.com/KiwiSDR if it is registered on rx.kiwisdr.com
Note: Consider specifying coordinates that don't reveal your exact location, although the various maps add some dither to the location when zoomed-in as a privacy measure.
Registration on rx.kiwisdr.com
On the Your kiwi will not be listed unless kiwisdr.com can connect and poll its status periodically. Make sure you have the menu on the admin page, "connect" tab setup correctly for your connection situation. Test it. For example use a cellphone with wifi switched off so your are accessing the Kiwi through the Internet via the cell network instead of locally via the (local) wifi network.
Make sure your location on the various map sites (e.g. rx.linkfanel.net) shows the correct latitude and longitude. A common mistake is not specifying a negative longitude for the Americas or a negative latitude for locations in the southern hemisphere (we've made this mistake ourselves). You can use the
If the GPS is running, and has a fix, a blue button labeled
See Configuration when using a down-converter for a description of how to use the
DX
The DX tab (not available on mobile devices) controls the content displayed in the DX label and band bar areas above the frequency scale. And also in the "select band" menu on the main control panel. As you make changes they should be immediately reflected in all active user connections (except for file import discussed below which requires a restart).
The
- stored (writeable)
- EiBi (writeable)
- Community (downloaded)
Changes are saved as you type. The message Changes saved will appear when a save occurs.
It is extremely important that you maintain timely backups of the label database. Especially if you've spent many hours carefully curating an extensive, customized set of labels. Use the
Export:
JSON
CSV
buttons to download a copy of the labels onto the computer running the browser.
The band bar and select band menu information is stored in the normal Kiwi configuration file. This file is saved, along with everything else, when you make a full system backup to SD card (see admin page "Backup" tab). You could also backup the files individually using a file transfer program such as WinSCP. The files are named:
| /root/kiwi.config/dx.json |
| /root/kiwi.config/kiwi.json |
| /root/kiwi.config/admin.json |
There are four sections that can be shown or hidden using the
+
and
-
buttons on the left. They are:
| Stored DX labels | Defines the labels themselves. |
| DX type menu | Defines content of Type menu appearing in |
| Band bars | Defines content of band bars and select band menu on user page. |
| Band service menu | Defines content of Service menu appearing in |
If you hover the mouse over the icon a popup will appear with additional information.
Stored DX labels
The fields are the same as those in the user connection DX label edit panel.
The
+
and
-
buttons will duplicate and delete, respectively, a label entry. The duplicate function allows a new label to be created before the first and after the last existing entries, or anywhere in-between.
The button allows the optional schedule information to be added. If the schedule is the default (always active, 0000 - 2400, 7-days) then the schedule controls are not displayed to save screen space. Use the button to reset the schedule to the default. More information about label schedules.
There are search controls at the top right for the
See the end of this section for a discussion of editing the dx.json file directly.
DX type menu
The Type menu in the Stored DX labels section above has some values associated with the default dx.json file. But just as with the DX labels you can change the type values to be whatever you like.
However, it is important to understand how changing the type values will effect existing labels. If you have labels that use a particular type, let's say using the type menu name associated with the T1 entry on the
You can define up to 14 different type entries. The 15th type is used in implementing masked frequencies and cannot be changed or removed.
The HTML color name field accepts all HTML color name specifications, including by name, hex value (e.g.
For reference, the colors used with the EiBi labels are:
| cyan | hsl(300, 100%, 80%) | deepSkyBlue |
| silver | hsl(50, 100%, 70%) | peachPuff |
| mediumAquaMarine | hsl(270, 100%, 80%) | hsl(180, 100%, 80%) |
| hsl(70, 100%, 45%) | springGreen | hsl(0, 100%, 75%) |
Band bars
These next two sections control the band bars seen above the DX labels and frequency scale.
And also the content of the The order of entries in the band bars section exactly determine the content of the
The
The ITU Region 1|2|3 selection filters when the entry will be shown based on the Kiwi ITU region configuration. Note that entries with ITU region specified typically have different values in the Chan field to account for the different channel spacing in those regions.
The Band name value is the name used in the menu and/or band bar. The band bar name is also augmented by the Menu entry name (service name) and optional Long name fields described below.
An entry in the Band freq/mode field sets a specific frequency and mode when a
It is possible to have Min and Max frequency values in this list larger than 32 MHz for when a frequency offset is being used (i.e. downconverter/transverter operation).
Band service menu
This section defines the Service menu in the preceding section. The HTML color name
field has the same specifications as described above. An example of how the resulting band bar
will look with the given color and service name appears on the right.
The two name fields here, Menu entry name (service name) and Long name and the Band name in the preceding section are used in slightly different ways to construct naming in the
Let's consider a service name of
Editing the dx.json file directly
In some cases it may be easier to make a large number of changes using a text editor on another computer. The
Export:
JSON
CSV
and
Import:
JSON
CSV
buttons can be used to copy the label database file. Note that as soon as you import (upload) the Kiwi must be immediately restarted (you will be prompted). If any illegal format JSON or CSV is detected in the labels after the restart error messages will appear in the Kiwi log and a count of the number of bad labels will appear on the DX tab. The bad labels are discarded. So to repair you must fix them in the file and import again.
Here are some files you can JSON import directly or use as a basis for text editing.
- The default labels: dx_labels_default.json
- Deletes all default labels: dx_labels_empty.json
- Mask all except ham bands: dx_labels_ham_bands_only.json
|
|
The parameters can be any combination of:
| "Tn":1 | Type code linking to a type menu entry, |
| "lo":Hz, "hi":Hz | Passband |
| "o":Hz | Offset |
| "d0":DOW_value | Day-of-week schedule value, MTWTFSS = hex bits 0x7f, example: M_W__SS = 7'b1010011 = 0x53 = 83. |
| "b0":hhmm, "e0":hhmm | Begin and End schedule times (UTC) |
| "p":"extension" | Extension |
Some examples:
| [ 5000.00, "AMN", "WWV", "time signal" ] | Both Ident and Notes fields |
| [ 7038.60, "USB", "WSPR", "" ] | An empty Notes field |
| [ 8653.00, "USB", "FSK", "", { "T1":1 } ] | Type is second entry (T1) in DX type menu |
| [ 8681.00, "USB", "FAX", "NMC", { "lo":800, "hi":2200, "p":"fax" } ] |
Passband: lo=800, hi=2200 Hz Extension: FAX |
| [ 2500.00, "AMN", "BPM", "time signal", { "b0":730, "e0":100 } ] |
Schedule (UTC): begin=0730, end=0100, 7-days |
| [ 4458.00, "USB", "XPB", "MFSK", { "d0":33, "b0":2050, "e0":2100 } ] |
Schedule (UTC): begin=2050, end=2100, DOW: Tue,Sun = 7'b0100001 = 0x21 = 33. |
Some characters in the string fields (e.g.
URL percent (%) encoding. They are listed below. These encodings are used in any exported JSON or CSV files. When you edit a file you must use the encoding, except you can enter UTF-8 characters directly. The UTF-8 will be encoded when the files are imported and subsequently re-exported.
| Character(s) | % encoding | |
|---|---|---|
| control chars | %00 - %1f | Use No reason to use the other control chars. |
| " | %22 | Double quote. |
| % | %25 | |
| \ | %5c | |
| delete | %7f | No reason to use this. |
| UTF-8 bytes | %80 - %ff |
You can enter UTF-8 characters in your text editor but they will be encoded when the file is imported and subsequently re-exported. |
For CSV files the semicolon
For example:
Or use the
Extensions
WSPR
If you don't have a Ham radio callsign, but would like to contribute your Kiwi's WSPR
decodes to wsprnet.org, set the Security
Public/private channels
On the admin security tab you will find a setting allowing you to disable the password prompt for a subset of the 4 channels (none, 1, 2 or 3) when an overall user password has been set. This allows you to divide the 4 channels into two sets: a publicly-available set requiring no password and a private set requiring a password. Owners of the more popular Kiwis have long complained that the channels are always full and they, or their friends, can never get in without restarting the server and dumping everyone off. It is hoped this feature may persuade some owners of completely closed Kiwis in desirable locations to make some of their channels public.
Controlling the server from a Beagle login
Although most of the control and configuration of the server is accomplished via the admin webpage, there are some shell commands that can be used. Login to the Beagle from another computer using the debian account and obtain a root shell with the command
ku (Kiwi up) Restart the server.kd (Kiwi down) The SDR stops and returns a "down for development" message.ms (make status) Reports server status and last log messages.mu (make users) See who's been using your KiwiSDR.ml (make log) Prints all the log files.msl (make short log) Prints just the recent log file.up (update) Forces a software update to the latest version on Github.- There are a number of others that are less useful. See
/root/.bashrc and theMakefile for more information.
Special access-related configuration
There are several configuration options related to admin access of the Kiwi. For security reasons these are specified by files in the /root/kiwi.config directory on the Kiwi rather than directly in the web-based admin configuration. The file names and their contents are:
opt.admin_ip -- Limits admin connections to a single IPv4/IPv6 address (put IP address in the file). Multiple addresses and domain names are not currently supported.opt.no_console -- Disables the console tab function on the admin page which effectively prevents root shell access from the web interface. Just create a file of this name. The file contents don't matter (i.e. file can be empty). This has no effect on any other security measures you may, or may not, have taken on the Kiwi (e.g. set a root password, changedsshd configuration). Therefore note you may still be able to login as root to the Kiwi usingssh orPuTTY .opt.console_local (release v1.696 and later) -- Limits admin console to local network connections only. This feature used to be a setting on the admin security tab. But it is more correctly implemented here where it is more secure. The file contents don't matter (i.e. file can be empty).
You can setup this file by entering these commands in the admin console:cdk touch opt.console_local
Now the next time you attempt an admin console connection from outside the local network the connection should be denied. Note that proxy connections ar considered Internet-based connections even if used from a browser on the same local network as the Kiwi. And so admin console access will be denied. For example from the local network connecting to kiwisdr.local:8073 or (IP address):8073 will work whereas (serial number).proxy.kiwisdr.com will not.
Antenna switch configuration
Notes about the configuration shown on the admin extensions page, antenna switch section:
-
Switch device:
List of antenna switches supported by Kiwi's internal switch software -
cURL command arguments:
When an antenna is selected that contains a network-enabled device, such as a downconverter, this field can be used to run cURL commands to configure the device.
For example the N6GN 0-2 GHz All-band, All-mode Transmit & Receive Converter, which contains a WiFi web interface, can be sent these commands to set the 20 MHz wide conversion block frequency and preamp enable (among many others). So to setup reception covering the 2m band, with the preamp on, set the field to:
192.168.1.126:8078/?Ftune=144 192.168.1.126:8078/?setPreamp=1
This of course assumes the device is configured for the IP address and port shown.
Each of the space delimited commands in the field are wrapped in a cURL command before being run:curl -skL '(command)' >/dev/null Only these characters are supported in the command -- all others are removed: a-z A-Z 0-9 & + , - . / : = ?
Use the plus sign ('+') where you need a space to appear.
Manual frequency calibration
If your GPS antenna is connected and receiving signals then the KiwiSDR clock frequency will be continuously calibrated automatically. If not you can perform a manual calibration. There are two sources of clock oscillator error. Inherent error due to manufacturing variations and error that changes with the ambient temperature. A manual calibration will correct the inherent error, and error due to the current temperature, but will not track error due to future temperature changes. Follow these steps:
Tune to a station transmitting a carrier on a known, accurate frequency like a time station (WWV 15 MHz in this example). Use the highest frequency station possible as this will show the most offset (i.e. an HF station rather than LF/VLF). Zoom all the way in and select the exact center of the carrier line in the waterfall with the mouse. The yellow vertical bar of the passband should align with the waterfall carrier line. See image below. Note the WWV -/+100 and +600 Hz modulation shown in addition to the carrier (frequency scale ticks are 100 Hz).

Right-click to bring up the menu and select
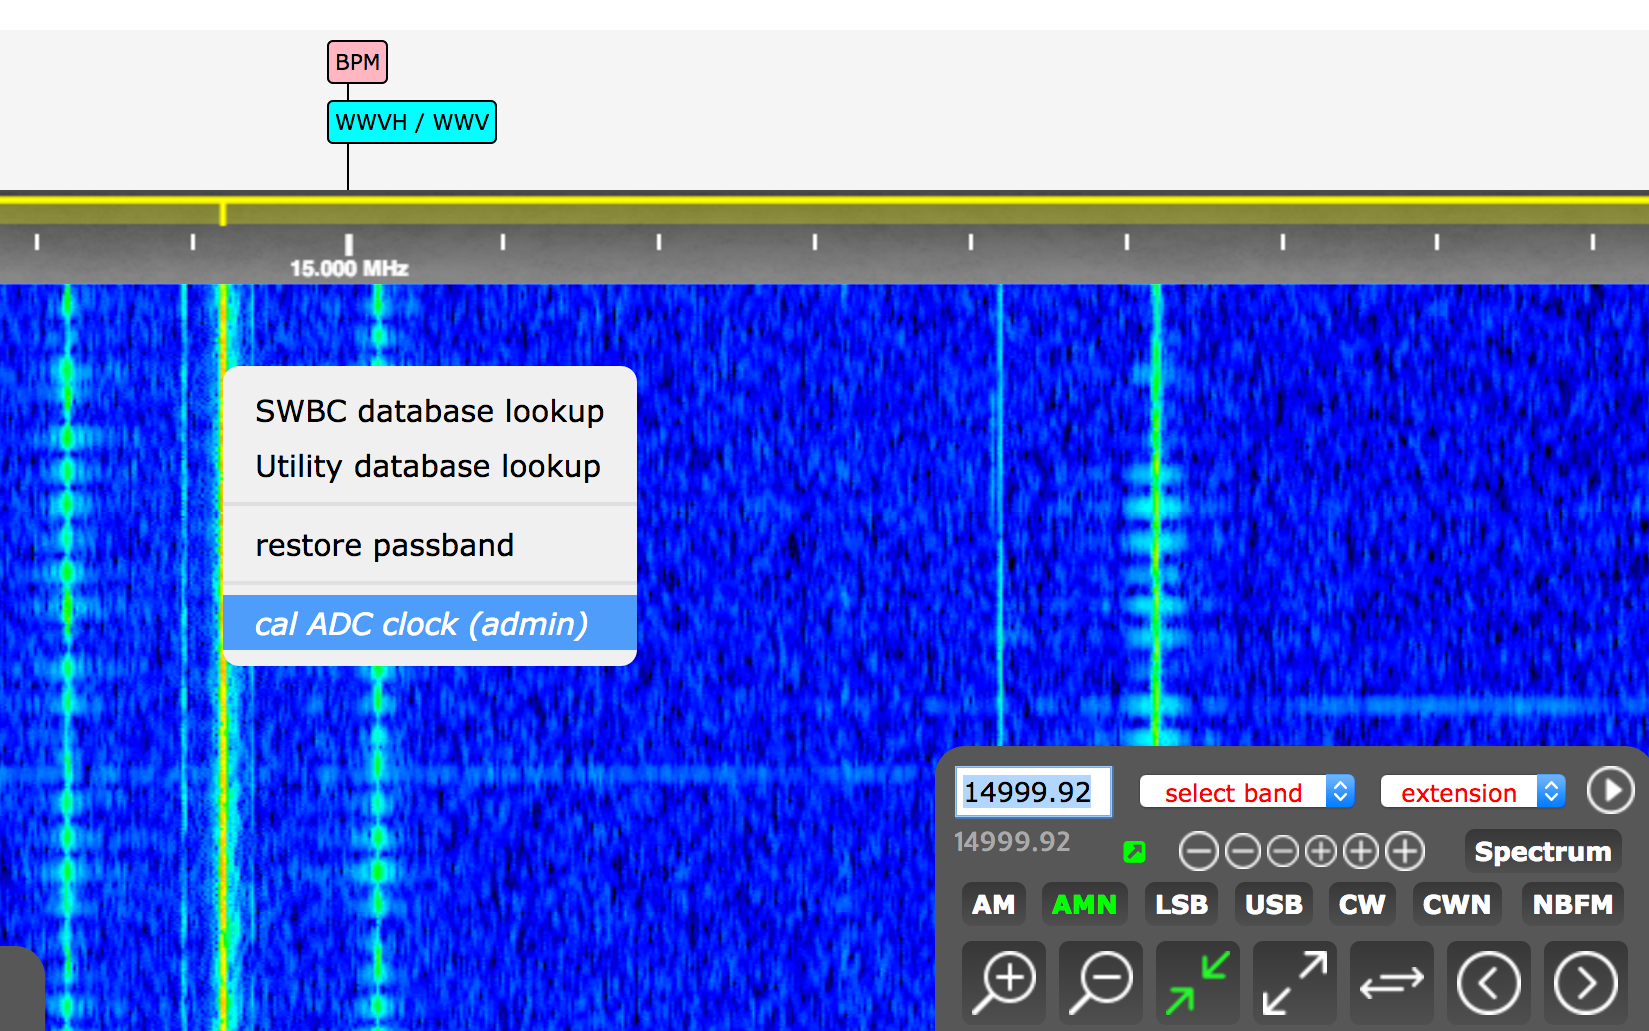
A confirmation dialog will appear showing how far the clock must be adjusted to get to the nearest 1 kHz. In this case +81 Hz is needed to get the carrier on 15000 kHz. The normalized ADC clock adjustment in parts-per-million (ppm) is shown, 4.9 ppm in this case.
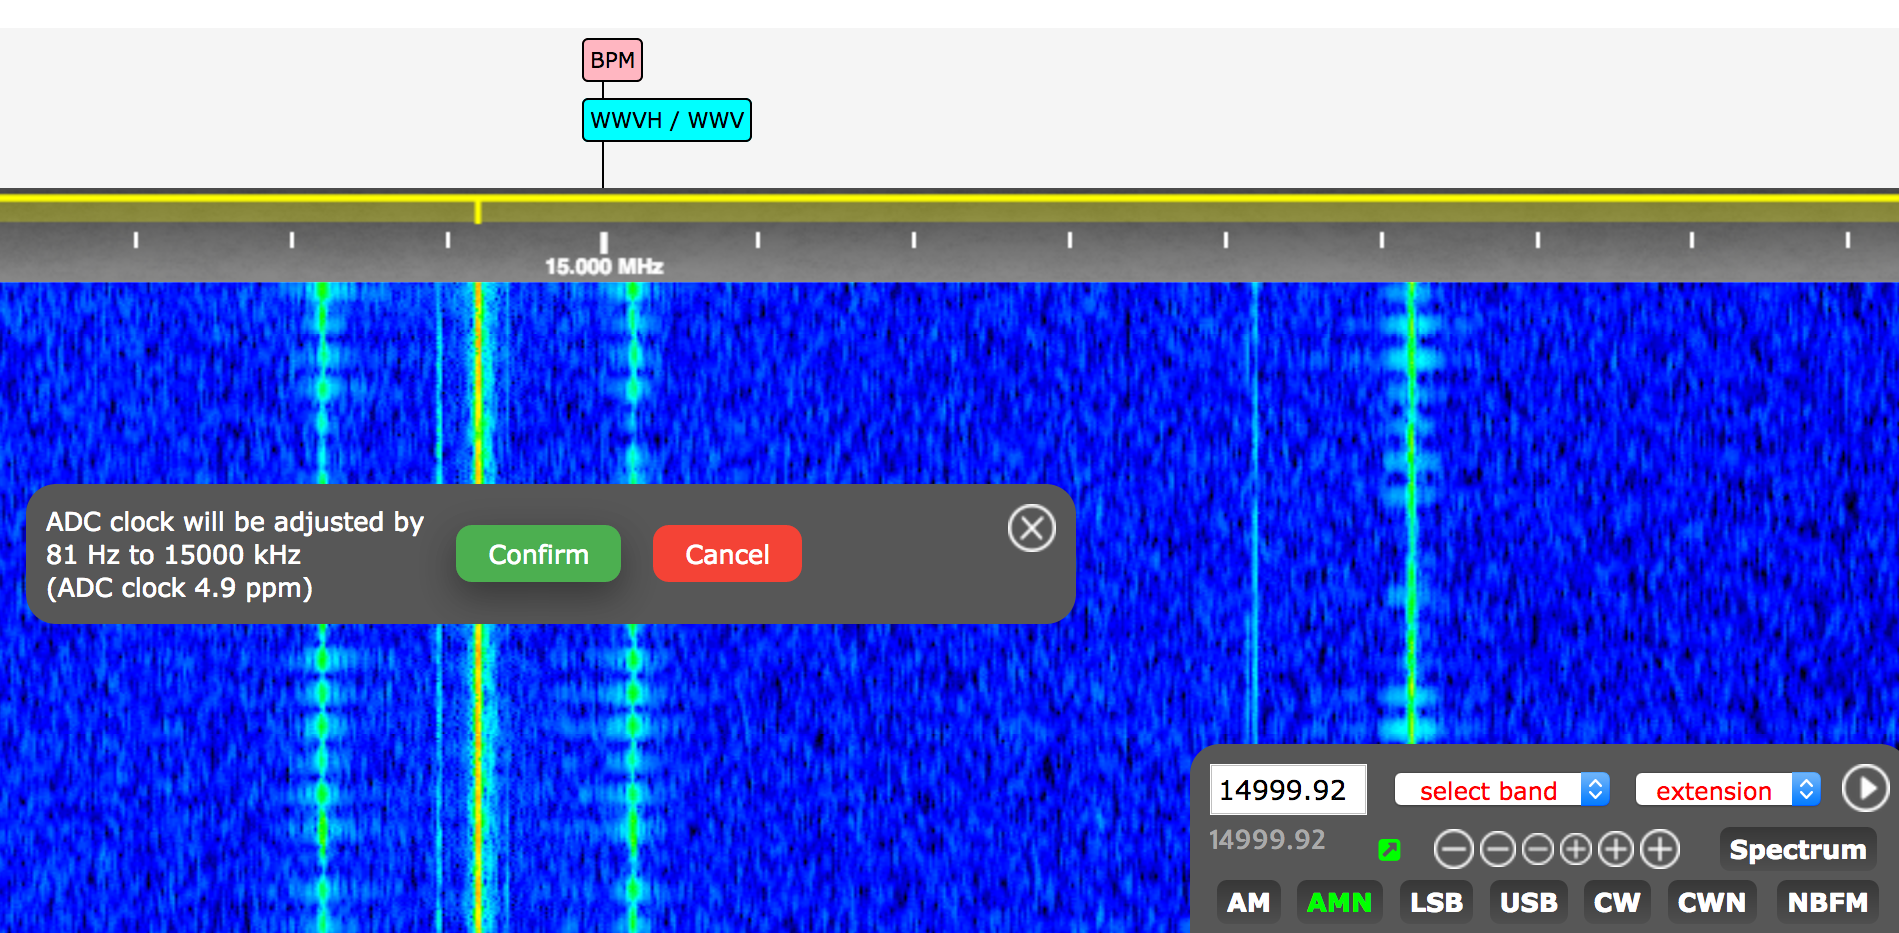
As soon as

Upgrading a Debian 8 based Kiwi to Debian 11
It is important to consider upgrading Kiwi-1's running the older Debian 8 system to Debian 11. Not only because Debian 8 is no longer receiving security updates from debian.org but also because some future Kiwi improvements cannot be supported on Debian 8.
On the admin page, "backup" tab, you will find a new button on the right side: "click to write upgrade SD card". Use it to prepare an sd re-flasher card that will upgrade your Kiwi to Debian 11 while also retaining all the customizations you have made.
Insert the sd card prior to clicking the button.
The new procedure greatly simplifies the upgrade process by automating these formerly manual tasks:
- Checks for sufficient free disk space.
- Downloads Debian 11 image file from kiwisdr.com with integrity check (checksum).
- Writes image to SD card.
- Copies configuration from Kiwi's kiwi.config directory to SD card.
- SD card is now ready to be use to re-flash this Kiwi to Debian 11 on the next restart.
- Including if you were to immediately restart after the sd card creation completes.
Downloading the software onto an SD card
This procedure is normally not necessary since, if you purchased the Kiwi "full" version which includes a BeagleBone Green (BBG), the software is already pre-installed on the BBG. However there are cases where you might want to download the software:
- You have a Kiwi using an older Debian release and you want to upgrade.
- You want to get a head-start on installing the software if you've ordered just the Kiwi board and are supplying your own Beagle etc.
SD card write failures caused by insufficient power supply current delivery
You may find this difficult to believe. But trust us, we've seen this problem many times over the years. If you're having trouble getting this procedure to work try removing the Kiwi board from the Beagle and repeating the procedure using the Beagle alone. Note the alignment of the Kiwi board pins and the Beagle header when removing the Kiwi board. You will have to power the BeagleBone Green from its micro USB connector since it doesn't have a 2.1 mm round DC jack like the Kiwi board (if you happen to be using a KiwiSDR 1 with a BeagleBone Black then it does have a DC jack you can use).
The problem is that SD card writes require large peak currents. More than the Beagle + Kiwi board together require during normal operation. So if sufficient current isn't being delivered by your power supply then the writes may be failing or the Beagle may shutdown completely during the process. By removing the current load taken by the Kiwi board a marginal power supply might now work.
Be extremely careful when reassembling the Kiwi board onto the Beagle. Make certain the
Kiwi pins are plugged into the correct Beagle header locations. If you're "off by one" on reassembly the Kiwi board can be
destroyed by incorrect voltages being applied to the wrong pins.
Debian 11 -- BBG/BBB version
If you are reading these instructions because you want to upgrade your Kiwi to Debian 11 then you must follow the detailed instructions given on the Kiwi Forum. Simply following the procedure below is NOT sufficient to fully upgrade to Debian 11. Example: your Kiwi's configuration will not be restored! However, if you are installing the software from scratch (not upgrading) or don't care about saving your configuration then it's fine to use the Debian 11 image with the procedure below.
Debian 9 -- BBAI version
(A Debian 11 image for the BBAI will be released soon)
For BBAI, the flasher image below only restores the BBAI to factory state. No Kiwi software is installed. Follow the procedure on the Kiwi Forum to install the Kiwi software. Be careful: A BBAI-based Kiwi will not run using any other image versions.
Debian 11 -- BBAI-64 version
The BBAI-64 has always used Debian 11. So the flasher image for BBAI-64 is really only useful in a couple of cases:
- Your BBAI-64 no longer boots and you need to recover. Note that your Kiwi configuration will be lost by re-flashing. Instead, if you've made a backup using the admin page backup tab, your configuration will be restored.
- You purchased the KiwiSDR 2 "board-only" to go along with a BBAI-64 you already have. And it needs to be re-flashed with the the Debian 11 image containing the Kiwi software.
Procedure:
In case you are unfamiliar with the process of installing software on a Beagle here's how it works. The micro-SD card is what's known as a 'flasher'. Each time you boot your Beagle from the micro-SD card it will copy its contents to the on-board flash memory (eMMC) of your Beagle. In other words all the software previously installed on your Beagle will be
completely overwritten and lost
. So be very careful in using a flasher micro-SD. Remember, the copy operation will only occur when you boot from a micro-SD flasher. It is possible to insert a flasher micro-SD into a running system so that it may be read or re-written like any other card. But be certain to remove it immediately after you're done. Otherwise the next time you reboot the Beagle the flashing operation will begin (if the card is still a flasher). Even we make this mistake occasionally and it is very annoying to lose all your work that is stored on the Beagle's on-board filesystem.
Downloading:
An image file from the Internet must be downloaded and copied to a micro-SD card to turn it into a flasher. This can be done on the Beagle itself running whatever version of Debian Linux happens to be installed. There must be enough filesystem free space for the image file. Use the
- Obtain a micro-SD card at least 8 GB in size.
- Mac & Windows:
- Debian 11 -- BBG/BBB version
- Download this 658 MB .img.xz file to your Mac/PC
(SHA256: 2f60798f60b647f0b18f8ac7493776c7b75f22f17977dffdd6c8253274538c3f) - KiwiSDR_v1.804_BBG_BBB_Debian_11.11.img.xz
- Debian 9 -- BBAI version
- Download this 521 MB .img.xz file to your Mac/PC
(SHA256: 2177a191af9aaceee768921f0b2442e36fbb9369acb921957499d5e68b6447ec) - am57xx-eMMC-flasher-debian-9.12-iot-armhf-2020-06-01-4gb.img.xz
- Debian 11 -- BBAI-64 version
- Download this 1 GB .img.xz file to your Mac/PC
(SHA256: 090f9eead3d478fb3384cbf89cd13df0a119e2090e3b7cbfb5180cd3d0ffc06b) - KiwiSDR_v1.665_BBAI_64_Debian_11.9.img.xz
- Follow these Mac/PC-specific instructions for writing the file to the SD card. You may have to download one or more programs (e.g. for Windows Win32DiskImager and 7-Zip, for Mac Balena Etcher)
- Windows: raspberrypi.org and/or elinux.org
- Mac: Balena Etcher
- Note that you must use a program like 7-zip to expand the .img.xz file into a (much larger) .img file before using the .img file with the program that writes the SD card.
- Some of these programs can overwrite your PCs hard drive if the wrong device for the SD card is specified. So follow the instructions very carefully.
- Beagle / Debian Linux:
- Make sure the Beagle has a connection to the Internet.
- Login to the Beagle from another computer.
- From Linux: "ssh debian@(Beagle_ip_address)"
- From Windows: use "PuTTY" program or similar. Login as user "debian".
The password (unless you've changed it) is likely the Kiwi serial number or admin password or possibly "temppwd". Typesudo su to get a root shell. Use the same debian account password. - Debian 11 -- BBG/BBB version
- Get install script by clicking link or typing:
wget http://kiwisdr.com/files/kiwiSDR-download-KiwiSDR-BBG_BBB-Debian-11-create-micro-SD-flasher.sh
- Run script:
bash ./kiwiSDR-download-KiwiSDR-BBG_BBB-Debian-11-create-micro-SD-flasher.sh
- There is no script for the BBAI currently. Follow the BBAI instructions for Mac & Windows above.
- Get install script by clicking link or typing:
wget http://kiwisdr.com/files/kiwiSDR-download-KiwiSDR-BBAI_64-Debian-11-create-micro-SD-flasher.sh - Run script:
bash ./kiwiSDR-download-KiwiSDR-BBAI_64-Debian-11-create-micro-SD-flasher.sh
KiwiSDR 2 owners: Detailed information about using the re-flash SD card provided in the shipping box is here.
After you have an SD card with the flasher image power down the Kiwi. Open the Kiwi case, find the micro SD card slot, and insert the card into the slot.
Power up the Kiwi/Beagle. But note that before powering up you may have to hold down the boot button (switch) which is located on the Beagle circuit board top near the SD card slot (but the other side of the board). Look for a small black button. This button is a bit difficult to get to if the Kiwi board is installed. We use a small non-metalic tool to reach the button and hold it down while plugging in the power (the button gives a noticeable "click"). Release the button a few seconds after all of the 4 LEDs light up.
A few moments after booting from the SD card the LEDs will display a "back-and-forth" pattern as the image is copied to the Beagle on-board filesystem. The Beagle will power off when done (all LEDs will go dark). Takes about 5 minutes for a Class-10 SD card. IMPORTANT: Remove the micro-SD card when finished.
If you don't see the "back-and-forth" pattern in the 4 LEDs then your press of the boot button during power up wasn't recognized and the Beagle is actually running from the on-board eMMC instead of the SD card. Power down and try the procedure again.
Your Beagle now has the KiwiSDR-customized version of Debian installed and a snapshot version of the KiwiSDR server software itself.
Network update:
Debian 8 through 10:
When the KiwiSDR server is first run it will automatically update itself to the latest version since the re-flash image is always older than the most current version. This assumes your Kiwi has a connection to the Internet via the local network.
Note: The network update process can take 45 to 60 minutes. Please be patient. If the update doesn't complete
after that time ask for help on the Kiwi forum.
Debian 11:
The network update is delayed until the first overnight update window (1-5 AM local time) so you don't have to wait the extra hour for it to complete. This assumes the Kiwi has a network connection to the Internet etc.
If you are doing a BBG/BBB Debian 11 upgrade then return to the Kiwi Forum for instructions on completing the upgrade.
Due to increased security root logins are not allowed by default on Debian 9 and later. To enable them see this forum thread.
KiwiSDR discussion forum
The KiwiSDR forum is here.
Viewing the source code change log
To see the comments from recent changes to the source code look at the Github change log. If any comment there is followed by an ellipsis box (...) click on it for more information about the change.
By popular request there is also a summary CHANGE_LOG file that is easier to understand than the detailed Github commit log.
Power supply advice
The Kiwi must be powered using the round connector DC jack on the Kiwi board (2.1mm ID, 5.5mm OD). Powering over the micro-USB connector of the BeagleBone Green doesn't work because it can't supply enough current. The power management chip of the BBG will not allow more than 500 mA to flow on this connection. The Kiwi plus BBG draws over 1A and peaks approaching 1.5A.
Don't use the wrong size DC plug
Also note that many power supply DC plugs are actually meant for 2.5 mm center pin jacks, not 2.1 mm the Kiwi uses. This means they will fit loosely in the Kiwi jack and may cause unexpected power downs as the Kiwi or cable are moved around.
Be careful when using precision bench supplies
Be sure to set the current limit high enough (>= 2A) to catch the peak current requirements of the Kiwi and Beagle. A precision supply will react much more quickly to over-current situations than an ordinary linear supply using a big output capacitor to ride through peak current demand. A bench supply will instantly drop the output voltage the moment the current limit is reached. We've had several users observe bizarre behavior using precision supplies (random Beagle shutdown, SD card write failures, repeatable server "freeze" during certain operations, etc.)
Under-voltage due to cable voltage drop
The power management controller chip (PMIC) on the Beagle will refuse to power up the Beagle and Kiwi if the 5V input is below about 4.75V. Worse, if a momentary increase in peak current draw causes the input to drop below 4.75V due to losses in the cable the Beagle will unexpectedly power down. This problem has been seen by several customers and even ourselves. It is caused by cables with insufficient wire gauge. See this forum post. A 22 AWG USB-to-2.1mm adapter cable known to work is this one from Adafruit.
Using a quiet linear power supply to power the KiwiSDR / Beagle will significantly reduce received noise, particularly on the LF/MF bands. This is because almost all of these small line-powered units are switch-mode power supplies (SMPS) with inadequate filtering. The switching frequencies are typically in the 20 - 170 kHz range with harmonics sometimes extending well into the shortwave bands. Worse, the oscillators are almost always unregulated resulting in unstable carriers many kHz wide. Their emissions might meet regulatory requirements but that doesn't stop them from wrecking havoc when used to directly power an SDR. Check out this interesting article comparing the emissions and safety of common 5V USB SMPS chargers.
Transformer-based, regulated linear supplies are now more difficult to find. Particularly the wall-mount (plug-pack) type. This is partly due to new energy conservation laws requiring higher standby-mode efficiency from power supplies. It's pretty easy to make an SMPS draw minimal current when plugged-in but not in use. But it's difficult for a transformer-based supply due to the unloaded losses present in the transformer even when there is no connection. There is also the issue of poor conversion efficiency compared to SMPS.
We have tested two classes of linear supplies with good results:
- Audiophile power supplies
Jan 2019 update:
We've had a couple reports of the supplies from Ebay above showing up DOA or unable to meet the
Kiwi current requirement such that the Kiwi doesn't power up (even though the supply puts out 5V
under no-load conditions). The supplies were replaced by the seller, but caveat emptor..
- Bel Power Solutions, 5V 3A solder lugs, 100 - 240 VAC (strapable) solder lugs
If you absolutely must use an SMPS then consider this one which we have found to be fairly quiet. It uses a standard IEC C14 input connector which means you can find an adapter cord that that matches the mains plug requirement of your country/region (C13 on the cord mates with the C14 on the power supply). For example, USA would need C13 to NEMA 5-15P, AUS/NZ C13 to AS/NZS 3112, etc.
- Mean Well, 5V 3A, 2.1mm plug, 85 - 264 VAC IEC C14 input connector
- Mean Well, 5V 4A, 2.1mm plug, 85 - 264 VAC IEC C14 input connector
Antenna advice
Many of the Kiwi beta sites use simple wire antennas (dipoles, verticals, etc.) with good results (although LF/VLF usually suffers unless an active antenna is used). As with noise reduction, experimentation with antennas is usually an incremental process. If you are new to antenna building then start with a simple random wire. You will hear something. Then you can try a more complex antenna and see how much improvement there is.
The KiwiSDR Forum has many discussions about antennas and is a great place to ask for advice.
There are many commercial sources for E-field (whip, probe) and H-field (loop) active antennas. Here are some in no particular order:
- Loop
- W6LVP magnetic loop (USA-based shipping, T/R switch version)
- PK's loop antennas
- Active antennas from LZ1AQ
- Whip, probe
- Boni-Whip from Bonito
- HF active antenna from Minikits
-
MegaLoop
from Bonito
There are a number of active antennas, both kits and pre-built, on Ebay and AliExpress (although be careful about the quality of the latter). Most are based on the design of the PA0RDT Mini-Whip.
It is also not that difficult to construct your own. We're a fan of the designs from Chris Trask, N7ZWY, of Sonoran Radio Research: Complementary Push-Pull Amplifiers for Active Antennas
Articles about active antennas including advice about grounding of unbalanced (coax) and balanced feedlines:
- Active antenna overview, Martin, G8JNJ
- Fundamentals of the MiniWhip antenna, Pieter-Tjerk de Boer, PA3FWM (WebSDR)
- Grounding of MiniWhip and other active whip antennas, Pieter-Tjerk de Boer, PA3FWM
- Input filter for an active antenna, Pieter-Tjerk de Boer, PA3FWM
- Reduction of stray noise pickup, North Country Radio
- Reducing the Noise in Dipole Mode with Common Mode Filter, LZ1AQ
- KiwiSDR NZ accessories
- SDR front-end filter from Turn Island Systems, Paul WB6CXC
Extremely sharp 30 MHz lowpass filter. Plus a two-stage "shelving" filter that progressively attenuates signals below 10 MHz to help with Kiwi ADC overload problems (e.g. attenuates -20 dB on the MW band).
Product page, Technical description (3/4 down the page) - Antenna switches
-
The Seeed Bazaar sells relatively inexpensive SMA adapters:
SMA-to-BNC - We used this inexpensive 3.3V GPS active antenna during our development and a similar one ships with the Kiwi.
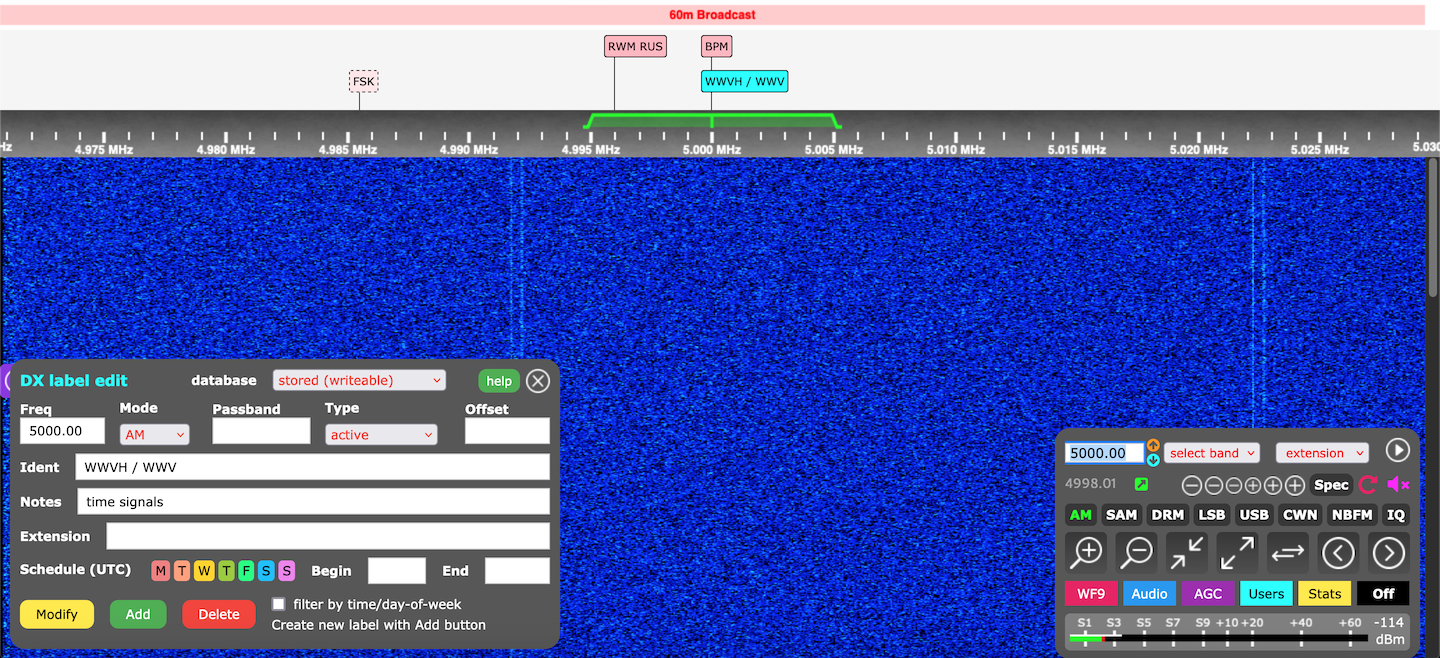
DX label editing
This section describes a panel accessible from an ordinary user connection that a Kiwi admin can use to make label changes. For an interface that's more suitable to making a large number of changes (and has other features) see the admin page DX tab.
The stored DX labels in the area above the frequency scale are editable by anyone who has admin privileges. Shift-clicking on a label will bring up a panel with the parameters you can edit. The admin password will be requested first if necessary. The
If you shift-click in a blank spot of the label area (i.e. not on top of a label) the panel is setup with the current frequency and mode. The type is set to the first entry in the
If you alt/option-shift-click on a label its type is toggled between the first two values of the
If you are a Kiwi admin it is possible to edit the stored DX labels on a mobile device. Touch the label to select it. Then two-finger tap in the waterfall to show the popup menu. Tap the
Details of fields in the panel:
- PassbandEnter a passband specification to override the default for the demod mode selected. You would do this to customize a label for a particular signal characteristic, e.g. a FAX signal in USB mode but needing a more restricted passband than the default for USB to get best reception.
The passband notation used is simplified compared to other places such as in the frequency entry field. Use a single number to specify a symmetrical passband width for modes like AM, IQ etc. Use two numbers separated by a space or comma to specify an unsymmetrical passband ("lo", "hi" freq) for carrier offset modes like sideband or CW. Numbers are in Hz or can be kHz using the suffix "k" i.e. "3k" "2.7k" etc. So an especially wide USB passband might be "300, 3k" and a restrictive AM passband "3k". A USB passband example is "-3k, -300". - Type, and creating blocked (masked) frequencies/bandsThe different types simply select a color for the label to help differentiate them.
There is one important exception. The last menu entrymasked is used to create a blocked frequency or frequency range where no reception is possible (i.e. no audio is heard and no waterfall appears). This is useful when the Kiwi admin wants to prevent users from listening to certain frequencies/ranges possibly tying up channels for long periods of time (e.g. Skyking HFGCS EAM broadcasts, CB band). The passband area, either the default for the selected mode or the custom passband field, defines the masked frequency boundaries. To define a large masked band area see this Kiwi forum post.
Here are two DX label database files that mask everything except the ham bands. Download by clicking on the .json or .csv link (either should work):
dx_labels_ham_bands_only.json dx_labels_ham_bands_only.csv
Then on the admin page, DX tab, load the file using the red "Import"JSON orCSV button. A restart is required. - OffsetThe offset field is used specifically for NDB band labels to create an offset in the displayed label position and the nominal carrier frequency. For example, an NDB with carrier on 276 kHz would have 276 entered in the label
Freq field. But "-1050" (Hz) entered in theOffset field so the vertical line of the label appears on 274.95 which is where the LSB modulation of the NDB ident is located for this particular NDB. When the label is moused-over a small yellow triangle in the label area shows the 276 kHz carrier point. This mechanism is meant to help distinguish NDB carrier and ident frequencies when there are many overlapping label definitions -- typical for NDB DX'ers who add many labels to their Kiwis. - IdentThe text inside the label is set from the ident field. A line break can be specified by using the HTML
<br> sequence. From version v1.499 the newline sequence\n can also be used. - NotesThe notes field text appears in a popup tooltip when the label is moused-over. From version v1.499 the newline sequence
\n can be used to specify a line break (and also the HTML<br> sequence). - ExtensionNormally when a label is clicked only the frequency, passband and mode is changed (and possibly masking). With the "extension" field it is possible to start a Kiwi extension as well. Specify the extension name and parameters in the same way as if they were being specified in the browser URL (minus the "
ext= " part). For example "s_meter " "wspr,40m ".
Labels that have an extension specified turn magenta when moused-over as opposed to the usual yellow. The extension is opened when the label is clicked (a shift-click opens that label in the edit panel as usual). - Sig bwWhen a label is clicked that has this parameter specified a line appears below the label. The width of this line represents the bandwidth of the signal. It is intended to give a visual indication of signals much wider than the passband of the receiver. For example OTHR, CODAR, HFT etc that might be 30 - 50 kHz wide. The line is removed when another label is clicked.
- ScheduleOptional schedule information can be entered specifying when the label signal might be heard (active). A label outside of its schedule period (inactive) is displayed in a lighter color with a dashed border (see the "FSK" label in the image above). But only if the panel checkbox
filter by time/day-of-week is unchecked. Otherwise labels filtered by schedule are not visible at all to limit screen clutter. This feature is similar to the EiBi database which also contains schedule information and a filtering checkbox.
On every 5 minute boundary (:00 :05 :10 etc) all labels automatically update so a label will transition between active/inactive etc with the appropriate change in appearance.
The label is considered active if the current UTC day-of-week (DOW) button is selected (not greyed out) and the current UTC time is between thebegin andend period. The default is active all the time (i.e. all DOW selected and UTC 0000 - 2400 which is displayed as blanks in thebegin andend fields).
There are a few considerations with this scheme. It's valid to specify a time period which crosses UTC midnight (2400/0000) and into the following day. Example: Timebegin 2300 timeend 0200, three hours later. If you wanted the label to only be active one day a week, on Wednesday, only leave the "W" DOW button selected. The software correctly compensates for the fact that the 0200 end time is on UTC Thursday. If you also specified the Thursday DOW the label would be active two days per week (Wed 2300-0200 and Thu 2300-0200), perhaps not what you want. Currently only one DOW/time entry per label is supported although the DOW days can be set arbitrarily and the time period applies to all of those days.
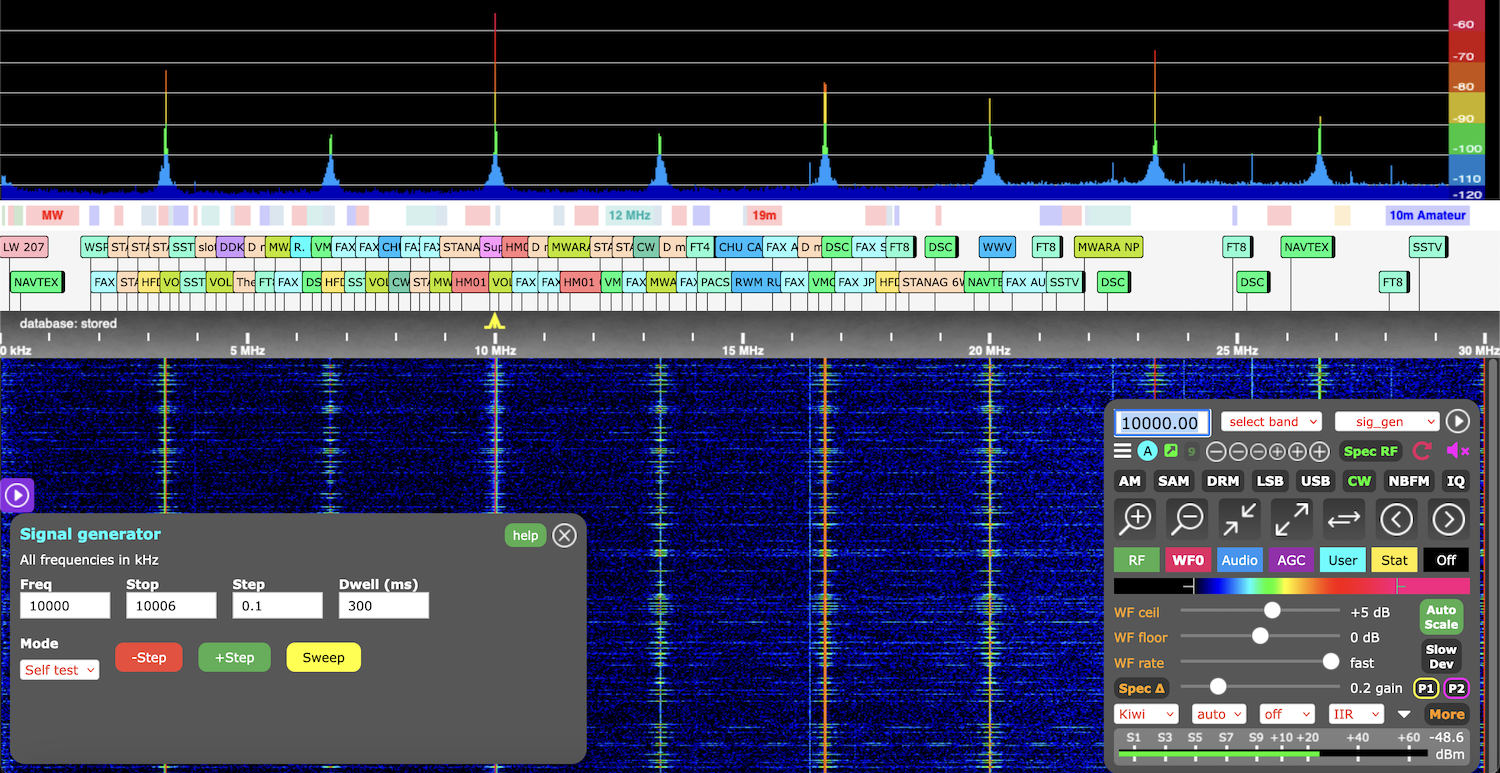
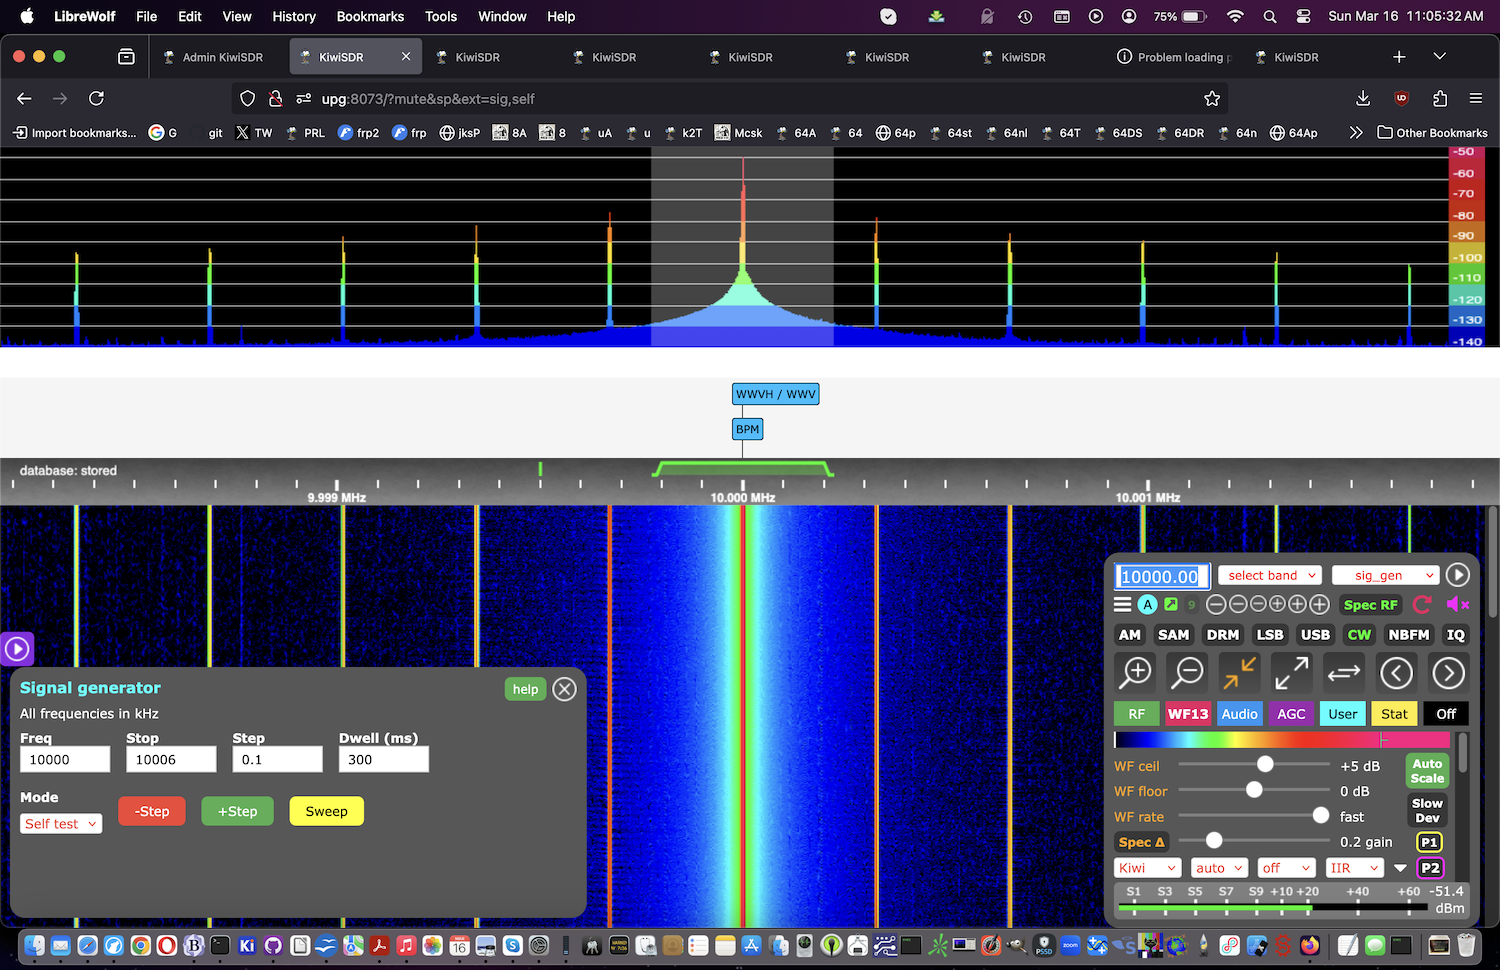
Self-test function
KiwiSDR 2 and later models contain a self-test function to help diagnose any problems with the RF front end. On KiwiSDR 2 the
While connected to the first user channel (rx0) make sure the waterfall is in "aperture auto" mode. Do this by using the "!" shortcut key (exclamation point) until the menu at the bottom left of the
Compare to the images below at the zoom levels indicated. The exact levels you will see in the spectrum and S-meter may differ slightly (a few dB) from what's shown. The analog circuit that generates the signal is very simple and not precise. The goal is to see if the RF front end is responding as it should.
The digital attenuator on the main control panel, RF tab, should accurately attenuate the signals shown in the spectrum display (top of the images below) and on the S-meter. There may be some lag in the spectrum values adjusting depending on the filtering method in effect (especially for the default IIR filter).
Note that the sig gen extension is only available if you are connected on the first channel (rx0). Also note that you must be in CW or AM mode for the S-meter to measure the peak value of the self-test carrier. Otherwise, in USB mode for example, you are just measuring the carrier sidelobe which is very much reduced in strength from the carrier.
Self-test cable connection: (click for larger)
Zoom level 0: (click for larger)
Zoom level 7 or 10: (click for larger)
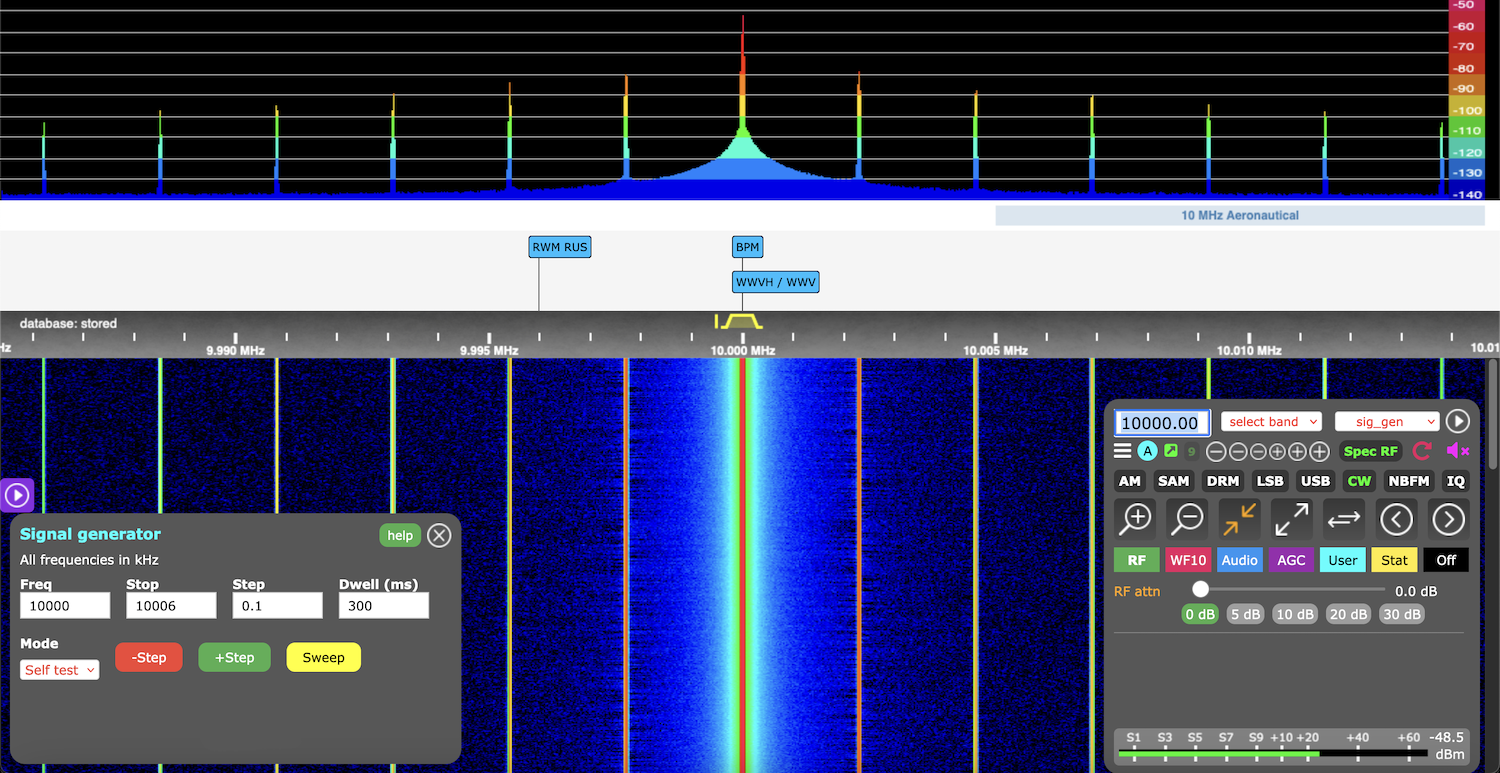
Zoom level 10 or 13: (click for larger)
ADC overload
The top right of the S-meter shows a red "OV" indicator when ADC overflow/overload is detected. Tests with a signal generator show the ADC overflows when a single-tone exceeding -15 dBm (almost S9+60) appears on the antenna terminals.
If you're in Europe be careful about ADC overload in the early evening from the gigantic SWBC transmitters nearby. It can also occur from very strong local AM MW BCB signals.
With KiwiSDR 2 and later you can use the built-in RF attenuator.
The following advice applies mostly to KiwiSDR 1. Use a smaller antenna or an inline attenuator if necessary. An attenuator can be as simple as a low-value potentiometer. Sure, the pot won't maintain a 50 ohm impedance like a proper Pi-network, but this is not critical. Adjust the pot until the overall waterfall noise floor drops to normal under high-signal conditions (roughly -100 to -130 dBFS shown on the spectrum display when fully zoomed in on a quiet frequency). Or until the "OV" indicator no longer shows.
One user cleverly notes that since the SMA and terminal block inputs are in parallel if you are connecting the antenna via the SMA connector you can place a swamping resistor or pot across the terminal block.
Martin, G8JNJ, has an excellent article on constructing simple series-tuned shunt filters to attenuate specific problem frequencies.
Our friends at RTL-SDR.com are now selling an inexpensive broadcast AM block high-pass filter. Note the -3 dB point is 2.6 MHz so 160m will be attenuated in addition to LF/VLF.
One user has found some very inexpensive inline SMA attenuators on Ebay. At those prices you can afford to buy a range of values and connect them in series to get the optimum attenuation.
There are several forum topics giving details about the OV indicator and MW band attenuation ( here, here, and here) including excellent work by Jim, WA2ZKD.
The images below show severe overload from two extremely strong signals on 720 and 810 kHz (exceeding -20 dBm, S9+53) in the AM broadcast band from a Kiwi located in a major city. Note the harmonics of the BCB extending into HF and the raised noise floor from all the reciprocal mixing. Zooming you'll find mixing products every 9 or 10 kHz up and down the band from VLF to 30 MHz (9/10 depends on regional BCB station spacing). The existing antenna is necessary for adequate HF reception so some sort of BCB filtering will be necessary. Click on images for larger.


Noise reduction advice
Finding and reducing noise sources is an incremental process. We find it helpful to take a screenshot of the Kiwi waterfall before and after a particular noise reduction technique is tried. This will help you gauge how effective a fix is and even if a fix to one problem makes another worse.
E-field active antennas are compact and relatively easy to deploy, but are very sensitive to the local noise environment. Consider H-field loops and loopsticks as an alternative.
- Experiment with different grounding configurations. At one location we found grounding the Kiwi to the apartment building CATV system coax outer braid made a huge improvement whereas grounding to the power mains safety ground was a disaster. At another location it was just the opposite. If possible try grounding to a dedicated ground rod.
- Use a toroid choke for every cable connected to the Kiwi and Beagle. To get enough inductance, especially at LF/VLF, stack three toroids (Fair-Rite 5977002701, 23mm ID, 77 material) and tape them together. Then wind as many turns as possible from each cable through the cores. Hopefully 8-10 turns although this will be limited by the size of the connector on the end of the cable (if any). As you pass more and more turns through the cores the connector body will eventually not fit even though more wire turns would. We've also had reports that type 43 material toroids installed on the coax near the antenna offers good noise reduction.
- Here's an excellent video by George, M1GEO, demonstrating the importance of mains filtering EMC & Shack Noise: Filtering the mains supply
- See these articles for advice about grounding of unbalanced (coax) and balanced feedlines:
- Reduction of stray noise pickup, North Country Radio
- Reducing the Noise in Dipole Mode with Common Mode Filter, LZ1AQ
Mouser & Digi-Key free international shipping
Although they don't seem to advertise it, Mouser in the USA has free international shipping to many countries for orders over USD $50. So if you buy a Bel power supply and a bunch of toroids from them it can be very cost effective. We get free delivery to New Zealand in only 3-4 days. It's the best thing since sliced bread!
Digi-Key now offers the same deal.
Troubleshooting advice
- The vast majority of problems are caused by voltage drop on the power supply cable. Please see Power supply advice.
- Check board voltages and clocks using the Troubleshooting guide.
Getting the IP address (DHCP-assigned or static) from the LED pattern
Important: The pattern described below does not appear on the LEDs until about one minute after the Kiwi has restarted / rebooted. The pattern displayed prior is defined by the Debian OS. The Debian "heartbeat" is the outer LED double-flashing every second. The other LEDs show information such as the access state of the SD card and on-board eMMC filesystem.
When the Kiwi software is running the four blue LEDs on the outer edge of the Beagle board (lower board of the two board stack) will display an encoded status message. Currently the message includes the IP address of the Beagle Ethernet interface and whether this address was set by a DHCP server or manually in the Kiwi configuration (network tab of the admin page).
IP address in this context means an IPv4 address (i.e. not IPv6).
The trick is to decode the message from the pattern displayed on the LEDs.
The structure of the message is as follows:
cylon-3x type cylon-2x content cylon-1x all-on-5-secs all-off-3-secs (repeat)
A cylon is a pattern where one lit LED travels quickly from left-to-right, and back again, either one, two or three times.
Type is a single digit (see below for digit definition)
'1' -- means content is an IP address set by DHCP server
'2' -- means content is an IP address set statically
'2' -- means content is an IP address set statically
If no IPv4 address has been assigned content will consist of 32 quick flashes of all LEDs.
This might happen if the DHCP server is slow (or failing) to set the IP address of the Kiwi or there is a problem with the configured static ip.
If the network uses only IPv6 addresses (i.e. not dual IPv4/IPv6) then content will consist of 16 quick flashes of all LEDs because display of IPv6 addresses is not supported.
An IP address is displayed as follows:
<3rd-digit> digit-sep <2nd-digit> digit-sep <1st-digit> num-sep
This is repeated four times to give a complete 12-digit IP address ABC.ABC.ABC.ABC,
where ABC are the 3rd, 2nd and 1st digits respectively, and digit-sep appears between each pair of digits and a num-sep appears where the dots ('.') are between the 3-digit numbers. IP numbers are always 3-digits and left padded with zeros if necessary, e.g. 192.168.1.23 is displayed as 192.168.001.023
Definition of LED patterns:
Digits are displayed in binary with the exception of zero which is displayed with
all four LEDs on. In the following * means LED on, - means LED off.
'1' - - - *
'2' - - * -
'3' - - * *
'4' - * - -
'5' - * - *
'6' - * * -
'7' - * * *
'8' * - - -
'9' * - - *
'2' - - * -
'3' - - * *
'4' - * - -
'5' - * - *
'6' - * * -
'7' - * * *
'8' * - - -
'9' * - - *
I.e. the values of the LEDs are the usual binary 8-4-2-1 code when read left-to-right with the left LED (value=8) toward the outside edge of the Beagle. Each digit is displayed for 3 seconds. If you are not good at sight-reading binary values this should give you time to write the LED pattern down. You might have to observe several repeats of the message in order to catch (or confirm) all the digits.
The digit-sep (digit separator) is two quick flashes of all the LEDs.
The num-sep (number separator) is six quick flashes of all the LEDs.
At the end of the message, after the cylon-1x, all the LEDs are lit for 5 seconds then are dark for 3 seconds. Then the message repeats beginning with the cylon-3x pattern.
LED pattern if FPGA communication fails
This is mostly an aid to Kiwi manufacturing. But if the Kiwi server cannot communicate with the FPGA at startup a special pattern is displayed on the LEDs: (software version v1.696 and later)
ping-pong 5x error code (preceeding repeats 5x) fast flashing
(entire sequence above repeats 5x)
(delay while Kiwi server code restarts)
(the above sequence will probably repeat if the error is persistent)
The ping-pong pattern is two LEDs alternating as follows:
* - * -
- * - *
(repeats 5x)
- * - *
(repeats 5x)
The error code is a number from 1 to 10 displayed as shown.
In the following * means LED on, - means LED off.
For the KiwiSDR 2 remember that the circuit boards inside the case are mounted upside-down. This means the high-order LED (the one on the left in the list below) is towards the outside of the case. So perhaps flip the KiwiSDR 2 upside down and read the 4 LEDs left-to-right to match the table below.
'1' - - - *
FPGA INIT signal never went LOW
'2' - - * - FPGA INIT signal never went HIGH
'3' - - * * couldn't open FPGA bit file
'4' - * - - FPGA configuration CRC error
'5' - * - * couldn't open eCPU code file
'6' - * * - FPGA not responding to ping1
'7' - * * * FPGA not responding to ping2
'8' * - - - FPGA ID mismatch
'9' * - - * eCPU firmware ID mismatch
'10' * - * - FPGA version mismatch
Errors highlighted in yellow are indicative of a hardware failure. Either the FPGA, power supplies, or GPS/ADC clocks. The others may only be software problems, although this is not guaranteed. See the troubleshooting guide for more information.
Kiwi user interface
Here are some aspects of the user interface that are not immediately obvious. In the descriptions below option/alt refers to the keyboard key usually marked
Clicking refers to left mouse button clicking. Right button or scroll-wheel clicking is specifically called out in the text to distinguish from ordinary clicking. We don't yet handle mice that have been configured for lefthand use where the button assignments are reversed (i.e. the right button functions as the left button normally would).
- Mobile device (touchscreen) differences Updated
- Passband adjustments Updated
- Keyboard & mouse shortcuts
- Saved session parameters
- International Beacon Project (IBP) label updates
- URL tuning and other parameters Updated
- Frequency entry field Updated
- Frequency URL link
- Right-click menu
- Query/control URLs New
- Mobile device (touchscreen) differences
Some touchscreen gestures are recognized:
- A two-finger tap on the waterfall will show the popup menu that on desktop appears when you
right-click. If you don't wish to make a menu selection make another two-finger tap on the waterfall. - A two-finger pinch motion (either pinch together or apart) will zoom the waterfall/spectrum in or out about the passband.
- Two-fingers placed next to each other horizontally, and slid back and forth, will adjust the frequency. This is opposed to the pinch gesture described above, or sliding one finger to adjust the waterfall position.
- On very small screens various parts of the display will not be shown by default
(e.g. top bar, dx label bar). Push the
Off button on the main control panel repeatedly to toggle the display of these elements. - The extension associated with a DX label (if any) can be opened by touch-holding the label for a moment. Otherwise a tap of the label simply tunes to the label frequency.
- If you are a Kiwi admin it is possible to edit the stored DX labels on a mobile device. Touch the label to select it. Then two-finger tap in the waterfall to show the popup menu.
Tap the
edit last selected dx label menu entry.
- A two-finger tap on the waterfall will show the popup menu that on desktop appears when you
- Passband adjustments
The passband is the yellow/green line drawn above the frequency scale. It represents the frequencies passed by audio filtering. It is most easily seen when fully zoomed-in. The vertical line represents the carrier ("zero" Hz) point. You can click-drag various parts of the passband to adjust it. But only when zoomed in far enough that the passband line color is green. Otherwise the passband line color is yellow and the parts are not adjustable (except for frequency tuning). When the cursor is over different parts of the passband a tooltip will appear showing various parameters of the passband (see below).
You can also change the passband in two other ways. By typing a passband specifier directly into the frequency entry field or by including a passband specifier as part of the URL tuning parameter.
Type theH key (capital H) to popup a list of all passband adjustment methods.- Smooth tuningClick-drag in the horizontal area of the passband to smoothly tune the received frequency. The center frequency of the passband is displayed.
- High-cut / low-cut filter adjustmentClick-drag with the cursor over the sloped ends of the passband to individually adjust the filter high or low frequency cutoff. The cutoff frequency and filter bandwidth are displayed.
- Filter width adjustmentOption/alt-click-drag with the cursor over the sloped ends of the passband to adjust the filter high or low frequency together, effectively adjusting the filter width about its current center frequency point.
Shift-click the zoom in/out icons (magnifying glasses) to also adjust the passband width around the center frequency. Each click widens or narrows the passband by 80% of its previous value. This is the equivalent of using thep andP shortcut keys described below. - Passband shift (aka passband tuning)Shift-click-drag anywhere in the passband to shift its center frequency without changing its width. The carrier (BFO) point remains unchanged.
- BFO tuningShift-click-drag with the cursor over the vertical carrier line to change the BFO (carrier point) while leaving the passband unchanged. As a comparison note that regular tuning = passband shift and BFO tuning done simultaneously. The carrier frequency is displayed.
- Passband parameters sticky across mode changesAdjustments to the passband are unique to each mode and are remembered when the mode is changed.
- Restore default passband settingsTo restore the default passband settings for a mode hold down the shift key before the mode button is pressed. A tooltip will appear reminding you the passband will be restored. New Typing
/ alone in the frequency entry field will restore the passband to the default value for the current mode. - Mouse wheel based changesWhen the cursor is positioned in the frequency scale the mouse wheel will adjust the passband as follows: With no keyboard keys pressed the wheel will adjust the width about the passband center. With
shift pressed the high passband edge will be adjusted. With thealt/option key pressed the passband low edge will be adjusted. - Audio tab passband sliders New
The user audio tab now contains sliders for controlling the passband. And also a button for restoring the passband to the default value for the current mode. This is especially useful for mobile devices where most of the desktop mechanisms for passband adjustment don't apply. - Spectrum passband marker New
The edges of the passband marker in the spectrum can be dragged to adjust the passband just like dragging the sloped edges of the green passband graphic on the frequency scale.
- Keyboard & mouse shortcuts
- General keyboard shortcutsMany keyboard keys are assigned shortcut functions. Type the
h or? keys to popup a list of all shortcuts. You can dismiss this popup with the escape key or by clicking theX at the top right. - Rounded frequency set (shift-click in waterfall or frequency scale)Instead of being set to the waterfall frequency directly under the cursor, the frequency is set to the nearest rounded value that depends on the band and mode. In this way you only have to shift-click close by to the even frequency your signal is likely to be transmitting on. The value is 9 or 10 kHz in the LW or MW band depending on the setting of the
9/10 step button. 5 kHz in the SWBC bands and 1 kHz everywhere else. - SWBC database lookup (control-shift-click in waterfall)The waterfall frequency under the cursor, rounded up or down to the nearest 5 kHz, is looked up on short-wave.info and displayed in a new window/tab. In the LW and MW bands the lookup is done using the mwlist.org database. On the NDB band the classaxe.com RWW database is used.
- VE3SUN DX cluster lookup (option/alt-shift-click in waterfall)The waterfall frequency under the cursor, rounded down to the nearest 100 Hz, is looked up on ve3sun.com and displayed in a new window/tab.
- Page down (control-click in waterfall or frequency scale)Shifts the waterfall down in frequency. Same as control panel left-arrow icon.
- Page up (option/alt-click in waterfall or frequency scale)Shifts the waterfall up in frequency. Same as control panel right-arrow icon.
- Mouse wheel zoomThe mouse wheel performs zooming.
- Saved session parameters
The following parameters from the current session are saved in browser storage and restored when you next connect:- Name/Callsign field
- Frequency
- Mode button
- Zoom level
- 9/10 kHz LW/MM band step button
- Waterfall/Spectrum settings
- Audio settings
- AGC settings
- Noise blanker/filter settings
Because browser storage are stored independently for each website these parameters will be stored independently for each KiwiSDR you visit.
- International Beacon Project (IBP) label updates
The labels displayed for the IBP signals on 14.100, 18.110, 21.150, 24.930 and 29.200 MHz automatically update every 10 seconds to show which world-wide beacon station is transmitting. The timing is taken from the KiwiSDR server and does not depend on the clock accuracy of your local computer that is running the browser. These beacon frequencies can be quickly selected under thebeacon section of theselect band menu. More information here about the NCDXF/IARU IBP system.
- URL tuning and other parameters
You can add parameters to the end of a Kiwi URL (web link). This is very handy especially with bookmarked URLs/links or home screen icons (mobile devices). Remember that the first URL parameter follows the/? characters and subsequent parameters are separated with the& character. For example:mykiwi:8073/?f=...&ext=...
parameter description f= set frequency with optional passband, mode and zoom pbw= or pb= set passband: width (carrier centered) orlow,high pbc= set passband: center using current width orcenter,width z= set zoom, 0 (max-out) to 14 (max-in) foff= set freq scale offset (local network use only) ext= load extension including optional parameters mute mute audio vol= volume: 0 to 200 mem= preset freq memory menu from comma-separated values sp or spec display spectrum using default filter sp= or spec= specify spectrum filter: iir, mma, ema, off spp= specify spectrum filter slider parameter unique to each filter peak enable spectrum peak hold mode wf= waterfall speed: 0, off, 1, 1hz, s, slow, m, med, f, fast wfm= waterfall min {,max} e.g. wfm=-110 or wfm=-90,-70 wfa= waterfall auto (=1) or manual (=0) aperture mode wfi= waterfall interpolation: wfi=0 to 4 or10 to 14 wfts= waterfall timestamp: in seconds (2 to 3600) cmap= waterfall colormap: 0=default, 1..n=(others) sqrt= waterfall contrast: 0=default, 1, 2, 3, 4 no_wf force open a no-waterfall / audio-FFT channel dx= DX label edit panel setup (EiBi database) no_geoloc don't send geo location info to server camp force open the audio camping/queueing page keys= sequence of keyboard shortcut keys to apply when connected user= or u= set "name/callsign" field m or mobile force mobile mode pwd= or password= specify time limit / masked frequency exemption password p or prot or protected request a password protected channel winN open multiple windows/tabs with one URL/bookmark
- Use the
f= parameter to tune to a specific frequency when connecting instead of the last value saved in browser storage. Use suffixM for a frequency in MHz.
Additional parameters are specified after frequency. Examples:
mykiwi/?f=14020 tune to 14200 kHz mykiwi/?f=7021.3cw 7021.3 kHz and cw mode mykiwi/?f=19.2cwnz11 19.2 kHz, cwn (narrow) and zoom (11) mykiwi/?f=10.1Mam 10.1 MHz (10100 kHz), am mykiwi/?f=1.4M/12000am 1.4 MHz, passband 12 kHz, am mykiwi/?f=4625/300,3300usb 4625 kHz, passband 300-3300 Hz, usb mykiwi/?f=100:400 pb 400 Hz center, current width
Passband ismykiwi/?f=100:400,100 pb 400 Hz center, 100 Hz width /width or/low,high , or:pbc or:pbc,pbw all in Hz
or use suffixk for kHz, e.g./300,2.7k
Use negative numbers for an LSB passband e.g./-2.7k,-300 vs/300,2.7k for USB.
Modes are: am amn lsb lsn usb usn cw cwn nbfm nnfm iq drm sam sau sal sas qam
Zoom is 0 (max-out) to 14 (max-in) - The
pbw= pb= andpbc= parameters duplicate the passband specifiers that can be given as part of thef= parameter. They are retained for backward compatibility. - Use
foff=kHz to set the value of the frequency scale offset prior to loading the user page. For examplefoff=118000 to make the freq scale cover 118 to 148 MHz. Available only from local network connections since it's a privileged (admin) operation. A restriction is that no regular admin connections can be open. Other active user connections will be prompted to do a page reload since the scale offset has changed. - Use
ext=extension-name[,extension-parameters] to start an extension immediately after connecting, e.g.
Themykiwi/?ext=wspr,40m start WSPR extension on 40m band extension-name can be any unique part of the names shown in the extension menu on the main page, e.g.iq foriq_display . The optionalextension-parameters are specific to the extension. Use thehelp button at the upper right of each extension control panel for a complete list of all possibleextension-parameters . - Use
mute to initially mute the audio when connected, e.g.mykiwi/?ext=wspr,30m&mute start WSPR ext with audio muted - Use
mem= to preset the frequency memory menu, ignoring any previously stored values, e.g.mykiwi/?mem=7200,10M,14300.45 - Use
sp= to specify the spectrum filter algorithm:IIR Infinite Impulse Response MMA Modified Moving Average EMA Exponential Moving Average off No averaging applied wfi= is the waterfall interpolation method used. The values 0 to 4 correspond to:
Adding 10 to the above values (i.e. 10 to 14) enables a CIC filter which helps0: Max Maximum value 1: Min Minimum value 2: Last Last value 3: Drop Drop sampling 4: CMA Cumulative Moving Average
keep the waterfall amplitude level.
The defaultwfi value is 13, drop sampling with CIC filter. This was found to
produce the best looking waterfall under crowded, strong-signal band conditions.dx=0|1|2[,open] selects the DX label database to use (default2 EiBi). The optionalopen parameter also opens theDX label edit panel. Also allows various database setup parameters to be specified. See theDX label edit panelhelp button for details.- The shortcut keys that can be used from a keyboard can also be specified in the
keys= URL parameter, e.g.keys=xyyys will cause the control panel to be hidden
(x key), top and label bars to be hidden (yyy keys) and spectrum display to appear (s key). - Some Kiwis have connection time limits and/or masked reception frequencies. But the operator may also choose to setup an exemption password. You will be prompted for this password when a timeout occurs. But you can also specify it in the URL with the
pwd= orpassword= parameter to prevent a timeout that might otherwise interrupt, for example, file recording. Specifying the exemption password in the URL will prevent the masked reception frequencies from being applied. -
Some Kiwis are configured to have a mix of password protected channels and publicly available channels not requiring a password. If you want to connect and specify a password so as not to decrease the pool of public channels then give the
p ,prot orprotected parameter in the URL. Note that if you are connecting from the same local network as the Kiwi, and admin auto-login has been setup, this is counted as a connection from the password protected pool and you do not need to specify this parameter. - To open multiple connections to multiple windows/tabs with a single link/bookmark use the
winN notation, e.g.mykiwi/?ext=wspr,40m&mute&win2&f=10000amnz8&win3&ext=s_meter
This opens 3 windows or tabs (depending on your browser configuration) with a muted 40m WSPR in the first, 10 MHz time station in the second and the S-meter extension running in the third using the last stored frequency/mode settings.
- Use the
- Frequency entry field
In addition to entering the tuning frequency in the top left field of the Kiwi control panel (at the lower right of the screen) you can also enter a passband specifier. The format is the same as that described above for adding a passband to thef= URL parameter.
Namely/width or/low,high , or:pbc or:pbc,pbw all in Hz.
Or use suffixk for kHz, e.g./300,2.7k to describe a typical USB passband.
The passband can be given with or without a frequency. So to change the bandwidth alone to 7 kHz just type/7k or to tune to 5 MHz with a passband of 8 kHz type5M/8k
You can use this in combination with the mode-selecting shortcut keys to change mode, frequency and passband without ever touching the mouse.
New Typing/ alone will restore the passband to the default value for the current mode.
New The center frequency of the waterfall can be changed without changing the receive (audio) frequency by typing#wf-freq into the frequency entry field, e.g.#7020 or#10M . Typing# alone will restore the waterfall center to the current receive frequency. - Frequency URL link
To the left of the six+ /- frequency step buttons is a green URL link icon. The intent is to provide a link you can copy and, for example, email to someone. That will allow them to tune to the same frequency, mode and zoom as what you are currently listening to. Clicking on the link will copy the URL information to the computer's clipboard. - Right-click menu
A right-click in the waterfall or frequency scale will bring up a Kiwi-specific menu.
It includes some items that are also available with other (often hard to remember) key combinations such as the database lookup and passband restore functions. On a laptop there are usually options for generating a right-click if your trackpad doesn't have left/right buttons (i.e. with a two-finger tap, control-tap, etc.) - Query/control URLs
These URLs can be used with a Linux/Windows command line program like curl to query and control various aspects of the Kiwi directly without needing the web interface or kiwirecorder. Example:curl my_kiwi:8073/status
access:local = local network only,any = anyone can access
what access URL and info USERS local /users returns: JSON information about each active channel SNR any /snr returns: JSON of all measured SNR data local /snr?meas function: causes an immediate SNR measurement ADC local /adc local /adc?level=non-zero level in decimal or hex local /adc?level=0 returns: see here ADC_OV local /adc_ov returns: JSON of raw ADC overflow count local /adc_ov?reset returns: JSON of raw ADC overflow count, resets count S-METER any /s-meter?freq in kHz returns: plain text of freq and measured signal level in dBm STATUS any /status returns: plain text "name=value" pairs of status parameters
Frequently asked questions (FAQ)
- Setup
- How do I know what IP address my Beagle is using?
- Why can't I attach an HDMI monitor and USB keyboard to the BeagleBone Black?
- Is there a solution for sharing a single antenna with multiple Kiwis?
- How can I protect against nearby transmitters and lightning-induced voltages?
- How can I use a wireless (WiFi) connection instead of Ethernet?
- Will it work with the BeagleBone Green/Black Wireless boards?
My power supply is good. Why doesn't the Kiwi power up?
When I move my Kiwi around why does it power off?
- What is the "Synchronous AM" (SAM) demodulation mode?
- How will KiwiSDRs participate in distributed applications?
- Why does the Kiwi stop working at my remote location that gets above 40 deg C?
- How can I receive DRM (Digital Radio Mondiale) broadcasts using the Kiwi?
Why is there a delay in the audio and can it be reduced?
- How do I recover from a corrupted software build?
- Is there be an automatic software update mechanism?
- How does access protection of the admin webpage work?
Why does Debian show the CPU always 100% busy?
- Why are there only 4 channels? Can this be increased?
- Why didn't you use a stacking-style header (cape) connector to the Beagle?
Why isn't there better filtering and a variable attenuator on the front-end?
- Why did you put a software-defined GPS on the board?
- Will running the GPS reveal my exact location?
- On the GPS tab of the admin page what do all those entries mean?
- On the GPS tab of the admin page how can I tell I have GPS reception?
- Why does the acquisition (acq) state sometimes say "paused"?
- Why doesn't the GPS seem very sensitive?
- I need to use a longer antenna cable. What to do?
FAQ — Setup
- How do I know what IP address my Beagle is using?
See the Network configuration section above for complete information. - Why can't I attach an HDMI monitor and USB keyboard to the Beagle?
This is assuming you have purchased the Kiwi "board-only" and are using your own BeagleBone Black that has HDMI. The BeagleBone Green supplied with the Kiwi full version does not have HDMI.
The HDMI port, with a cable attached, is a significant source of interference to the SDR due to the fast edge rates of the signals. Ever wonder when you look at the BBB schematic why there are 47 pF caps on the (non-differential) data lines going to the HDMI framer chip on the Beagle? Edge rate control. No doubt for sufficient emissions margin.
Also, by leaving the window system software off the Debian distribution on the micro-SD card, it installs on the Beagle in two minutes instead of twenty. For ordinary use you shouldn't have to make a terminal connection to the Beagle via ssh. You can just use the web-based configuration interface. - Is there a solution for sharing a single antenna with multiple Kiwis?
There is an excellent forum post about sharing an RF antenna with multiple Kiwis. - How can I protect the input against nearby transmitters and lightning-induced voltages?
There is a forum post about the issue of front-end protection. - How can I use a wireless (WiFi) connection instead of Ethernet?
The easiest way to achieve a wireless connection is to use a TP-Link TL-WR802N wireless nano router plugged into the Ethernet port of the BBG/BBB. Setup the WR802N to do transparent bridging to your existing WiFi network. We do that here and it works great. - Will it work with the BeagleBone Green/Black Wireless boards?
No. There is no support for the BeagleBone Green Wireless (BBGW) or BeagleBone Black Wireless (BBW) boards with built-in WiFi support. In the case of the BBGW the Kiwi board does not even fit due to physical interference with the 2x2 stacked USB connectors.
FAQ — Operation
- What is the "Synchronous AM" (SAM) demodulation mode?
As of software release v1.390 the Kiwi offers several versions of a synchronous AM detector for use with AM signals. The mode button toggles between a traditional double-sideband SAM detector and SAL and SAU which limit the passband to lower and upper sideband respectively. Use the keyboard shortcut 'A' to toggle the SAM modes.
Sideband selection overrides the Kiwi passband, i.e. if you are in SAL mode then adjusting the Kiwi LSB passband lower limit works as expected. But adjusting the Kiwi USB passband is totally ignored by the SAL demodulator because it is filtering out the upper sideband.
SAS offers a pseudo-stereo effect by routing SAL and SAU to the left and right ear exclusively. Note that SAS is a 2-channel mode like IQ so there is the same switching delay into and out of SAS as there is with IQ mode.
While in SAM mode the PLL carrier offset is displayed at the bottom of the "Stats" tab on the main control panel. To demonstrate that the SAM PLL is working use SAM mode on an AM station tuned to the exact center frequency. The PLL carrier value should be a small value like +/- 10 Hz or so. Then click roughly 1 kHz lower in frequency on the waterfall. You should hear the PLL carrier tone sweep as it re-locks to the station carrier. The carrier value will now display the roughly 1 kHz offset value. When doing this the PLL will sometimes get unlocked. Especially if there is adjacent channel interference within the passband. To re-lock, tune to the station center frequency, switch to AM mode, then back to SAM. - How will KiwiSDRs participate in distributed applications?
The exact mechanism used by an application that gathers data from many KiwiSDRs via custom code or FPGA changes is an open question. At the very least the configuration interface will allow an "opt-in" to whatever experiments are currently in progress. Your ideas are most welcome. Plenty of security implications too.
Since this FAQ entry was first written we now have our first distributed application: the TDoA direction finding service. More information here about TDoA from Nils, DK8OK: - TDoA Direction Finding: First Experiences on the KiwiSDR Net
- Direction Finding with TDoA on KiwiSDR Net: An Introduction
- Why does the Kiwi stop working at my remote location that gets above 40 deg C?
We've had a report of the Kiwi shutting down when running at a remote location location where the internal building temperature exceeded 40 deg C (104 deg F). The problem stopped when there was a modest airflow applied to the Kiwi even without lowering the temperature of the building. This might also be an issue if you place the Kiwi in your own enclosure (e.g. a metal one) without cooling holes. But we have not investigated this. - How can I receive DRM (Digital Radio Mondiale) broadcasts using the Kiwi?
Two ways: Using the built-in DRM mode button and using an external DRM-capable program (e.g. Dream or SoDiRa) and Kiwi IQ mode together with virtual audio cable (VAC) software.
First method: As of v1.360 the Kiwi has a built-in version of the Dream DRM decoder. See this forum thread for more information.
Second method: Digital radio broadcasts on shortwave using the Digital Radio Mondiale (DRM) transmission format can now be received beginning with the Kiwi v1.140 release and using the external Dream application. The newIQ mode button to the right of theNBFM button is used. In this demodulation mode IQ format data is sent on the stereo audio output of the browser. A "virtual audio cable (VAC)" program can then be used on the host computer to route the browser audio to the input of the Dream program. See this forum thread for more information.
You can find DRM transmissions in several ways. There is a published schedule although some of the stations listed do not appear to be active. You can also simply look on each HF broadcast band. A DRM transmission is easily distinguished in the waterfall from a regular AM signal due to the "flat" amplitude spectrum (see below RFI left vs HCJB right). Use theselect band menu to step through each broadcast band looking for DRM signals. Of course different bands will be active depending on the time-of-day at the particular Kiwi you are listening to. Use the Kiwi day/night map to check conditions.


FAQ — Admin
- How do I recover from a corrupted software build?
If you think you might have a corrupted build of the software on the Beagle proceed as follows. Login over the network to the Beagle using thedebian account. The password (unless you've changed it) is likely the Kiwi serial number or admin password or possibly "temppwd". From a Linux machine use thessh program, i.e. "ssh debian@kiwisdr.local ". From Windows tryPuTTY or something similar. Then type these commands on the Beagle:
sudo su This starts a root shell. Use the same debian account password.cdp (change directory project) This changes to the build directory.up (update) This should fetch the latest software from github.com, rebuild it, install it and restart the server.
- Is there an automatic software update mechanism?
Yes, the software checks for new versions on github and pulls updates from there. You can configure whether you want: no updates, update manually or update automatically in the background. Some users operate on networks with update policy restrictions. - How does access protection of the admin webpage work?
Access control to the admin webpage and the SDR itself are handled on theSecurity tab of the admin webpage. By default there is no admin password set which causes attempted admin access from outside the local subnet (i.e. from the Internet) to be ignored. So by default you don't have to change anything, or assign a password, to be protected. If you don't want access by other users on your local subnet then set an admin password. But pick a good password because it can be used by anyone who has access to the Kiwi, including Internet users, to gain access to the admin webpage.
If you are setting a password because you want to be able to administer the Kiwi from the Internet while, say, traveling, but you don't want the annoyance of having to give the password from your local subnet, then set the "Admin auto-login from local net even if password set? " option toyes . When you login with a password it is saved in a browser cookie, so this minimizes the number of times you must enter it.
FAQ — Publicly-accessible KiwiSDRs
- Can I limit access to my KiwiSDR when connected to the Internet?
Yes. There is a user password, separate from the admin password, used to control access to the main SDR webpage in case you want to limit access from Internet connections. You can also choose not to list your Kiwi on rx.kiwisdr.com although we encourage you to do so.
You can also divide the 4 channels into public and private sets. A setting on thecontrol tab controls an inactivity time limit. - How much Internet upload bandwidth is used?
Short answer: 40k bytes/second (320k bits/sec), all 4 channels active.
The compressed audio takes 4.8k bytes/sec and compressed waterfall 12k at the current maximum frame rate (about 23 Hz). For 4 channels you might expect the total to be 68k (total multiplied by four) but it is only 40k bytes/sec because the waterfall slows down under the load of four simultaneous users. - What's the worst case daily and monthly bandwidth consumed?
Short answer: 3.5 GB/day, 105 GB/month, all 4 channels active 24/7.
This is simply the observed rate for all four channels active (40k bytes/sec) multiplied out to a daily and monthly value.
There are plans to add a control mechanism to limit bandwidth consumption for users with capped Internet plans (e.g. 30GB/month). This would be done by throttling the waterfall update rate and/or maximum number of users evenly throughout the month, perhaps by having daily consumption targets.
FAQ — Design
- Why are there only 4 channels? Can this be increased?
Short answer: The digital downconversion (DDC) architecture used in the Kiwi only allows 4 channels of audio and waterfall before using up the resources of the FPGA and processing power of the Beagle. It's really an 8 channel DDC design since the waterfall is tunable independently of the audio.
Update: As the Kiwi software has evolved different tradeoffs between number of channels, audio bandwidths and waterfall availability have been made. In addition to the standard 4-channel mode you can also configure an 8-channel mode at the expense of only two of the channels having the full spectrum analyzer style waterfall (the others get an audio FFT). There is also a 3-channel mode where the audio bandwidth is increased from 12 kHz to 20.25 kHz for higher fidelity listening.
We've all been spoiled somewhat by WebSDR. We're used to the idea that modest SDR hardware (Sockrocks etc.) can support a dozen or more simultaneous connections. But the architecture and resources of those systems is very different from the Kiwi. The Kiwi is designed to be a completely self-contained, wideband (0-30 MHz), low-cost SDR not requiring any sort of external PC. In all cases with WebSDR a large part of a PC runs the FFT-based signal processing code. And the bandwidth covered by every WebSDR is relatively small: usually just a single band limited by soundcard bandwidth. The sole exception is the wideband Twente WebSDR which covers the same 0-30 MHz bandwidth as the Kiwi. But that system requires a very powerful PC with a c.a. US$1000 GPU card to process the multi-million point FFT required. It doesn't use a $39 BeagleBone Green. Sure, that system can support an astonishing 400+ simultaneous users, but you have to look at the tradeoffs. In exchange for full 0-30 MHz bandwidth on the Kiwi, at a relatively low cost, you only get 4 (8 really) DDC channels. - Why didn't you use a stacking-style header (cape) connector to the Beagle?
Short answer: signal integrity, cost.
You can always place the KiwiSDR as the outer board on a cape stack. Not using a stacking connector is a combination of factors.
Signal integrity: The SPI runs at 48 MHz. A stacking connector potentially allows a "T" of signals lines to be constructed if the KiwiSDR is in the middle of the stack. Signal reflections due to the unknown termination characteristics of the outer board could cause problems.
Cost: There is some additional cost for a stacking connector. It may seem small but every cost has been carefully considered to keep the overall board price low. Every user will end up paying for the stacking capability that few will use. It is also more difficult for the manufacturer to solder a stacking connector.
FAQ — GPS
- Why did you put a software-defined GPS on the board?
This is a frequent question. The short answer is that it hardly cost anything to do so. It's was almost cheaper to add the GPS front-end than upgrade the ADC XO, requiring some source of frequency correction, to a more expensive VCTCXO. Also, having constructed a prototype of Andrew Holme's Homemade GPS Receiver and having so much fun learning about the fundamentals of GPS signal processing, we wanted to offer a device you could purchase capable of running Andrew's code. There was room in our existing FPGA for the design and we ended up using parts of the GPS Verilog for the SDR (embedded processor, SPI interface). - Will running the GPS reveal my exact location?
No. The only place the high-resolution coordinates computed by the SD-GPS are displayed is on the GPSstatus tab of the admin webpage. So if access to the admin webpage is properly protected the GPS location will not be available. The locations shown on the main Kiwi webpage and on the public listing sites are from other purely text parameters configured on the admin webpage. So they can be completely arbitrary and set to not reveal your exact location. In addition, the public listing sites dither the locations shown on their maps slightly to guarantee privacy.
When a GPS solution has been computed a button will appear on thePublic tab of the admin page allowing thelocation field to be filled-in as a convenience. You can subsequently edit this field to obscure the exact position. But the dithering described above done by the public listing sites will essentially do this for you. - On the GPS tab of the admin page what do all those entries mean?
The page is divided into two sections. The upper has one line for each of the 12 channels of the GPS receiver. The lower has overall status information.
Upper channel display:- acq — Shows which channel the acquisition process is working with.
- PRN — Satellite identifier (from the transmitted pseudo-random number sequence)
- SNR — Signal-to-noise-ratio at acquisition. Minimum of 16 to begin tracking.
- eph age — Ephemeris age +/-hh:mm:ss. Normal value -4 to +4 hours.
- hold — How many bits in the current frame, out of 300, have been decoded.
- wdog — Watchdog that will timeout and free tracking channel if bits are not being decoded. Different timeout values depending on channel state.
- err — U = tracking loop unlocked. P = parity error. S = position solution. A = alert flag. Momentary errors are not necessarily a bad thing.
- subframe — Colored when GPS subframe correctly received. Blinks grey when updated. Subframes 1-3 required for position solution (and 4-5 for Galileo).
- novfl — Number of holding register overflows (a debugging aid).
- RSSI — Relative Signal Strength Indicator. Above 250-350 means sat actually present. Above 1000 is an excellent signal.
Lower status display:- acq — Acquisition state: "yes" if acquiring new sats, "paused" if active SDR connections prevent acquisition of new sats due to CPU resource constraints.
- tracking — Number of sats tracked and appearing in one of the 12 GPS channel slots.
- good — Of the sats tracked then number of those that are considered good enough to compute a solution from (min 4 for a solution).
- fixes — Total number of GPS position and time fixes computed.
- f/min — Fixes per minute.
- run — How long the GPS has been running (H:M:S).
- TTFF — Time-To-First-Fix: how long it took to get the very first solution after startup.
- UTC offset — Difference in seconds between GPS time (no leap seconds) and UTC.
- ADC clock — The GPS-measured true frequency of the ADC clock (nom 66.666600 MHz) In parens after are the number of computed corrections.
- lat, lon — GPS-computed latitude and longitude in decimal degrees.
- alt — GPS-computed altitude in meters. This value varies and is not accurate.
- map — Link to a map showning the GPS-computed location.
- On the GPS tab of the admin page how can I tell if I have GPS reception?
Your Kiwi is not receiving actual GPS signals unless thesubframe field described above is showing colors other than grey. Also thefixes field in the lower display will have an incrementing number. TheRSSI indicator is shown during the satellite acquisition phase even though there might not be an actual GPS signal present.
- Why does the acquisition (acq) state sometimes say "paused"?
The GPS process of searching (acquiring) new satellites is stopped when there are active SDR connections on the Kiwi. Existing sats will continue to be tracked (and timing solutions calculated) until they eventually drift out-of-range. This is because the acquisition process uses an expensive FFT which cannot run simultaneously when there are multiple SDR connections. The Beagle doesn't have enough CPU to do all this work and still meet the realtime deadlines. - Why doesn't the GPS seem very sensitive?
To help meet the Kiwi price targets a very modest "puck"-style GPS active antenna with a short, but lossy, RG174 coax cable was used. The antenna works okay when placed outdoors with a clear view of the sky. But this is often difficult given the short 3 meter cable. Also, the open source software is not as sophisticated as modern commercial GPS receivers which have had years of software optimization to improve performance. The Ethernet cable can be up to 100m long, so consider placing the Kiwi itself in a location where the 3m GPS cable will reach. Or see below for suggestions about how to extend the GPS cable.
Here is a forum thread detailing one user's experience in improving GPS reception.
- I need to use a longer antenna cable. What to do?
Extending the GPS cable must be done carefully so as not to increase the cable losses and reduce sensitivity even further. Do not extend the supplied antenna with additional RG174 coax as it has -1.5 dB/m loss at the GPS frequency (-4.5 dB for an additional 3m!) Instead use a length of lower loss cable: a short length of RG58, RG8 or LMR400.
When the combination of the puck antenna and cable type/length restrictions doesn't give a sufficient signal at the Kiwi GPS input it may be necessary to use another antenna with better performance. See these excellent GPS antenna/cabling recommendations from FEL. An example of a better antenna (with N connector for RG8/LMR400) from Ebay.